LoRaWAN Network Server setup
Libelium currently supports several LoRaWAN Network Server services. In this section, we explain how to set them up.
Remember that any LoRaWAN network needs a Network Server, so you have to choose one of the options above. Not only Libelium's Smart Parking nodes need a Network Server: any LoRaWAN device (by Libelium or other company) needs a Network Server, it's just one piece of the LoRaWAN architecture.
Loriot
This section explains how to route the information on Loriot to Libelium Cloud using the HTTPS protocol.
The free "Community account" does not permit remote downlinks. Therefore, a Commercial license should be purchased in order to use remote downlink messages for RTC sync, night-mode feature and node parameter update via Remote Configuration Form.
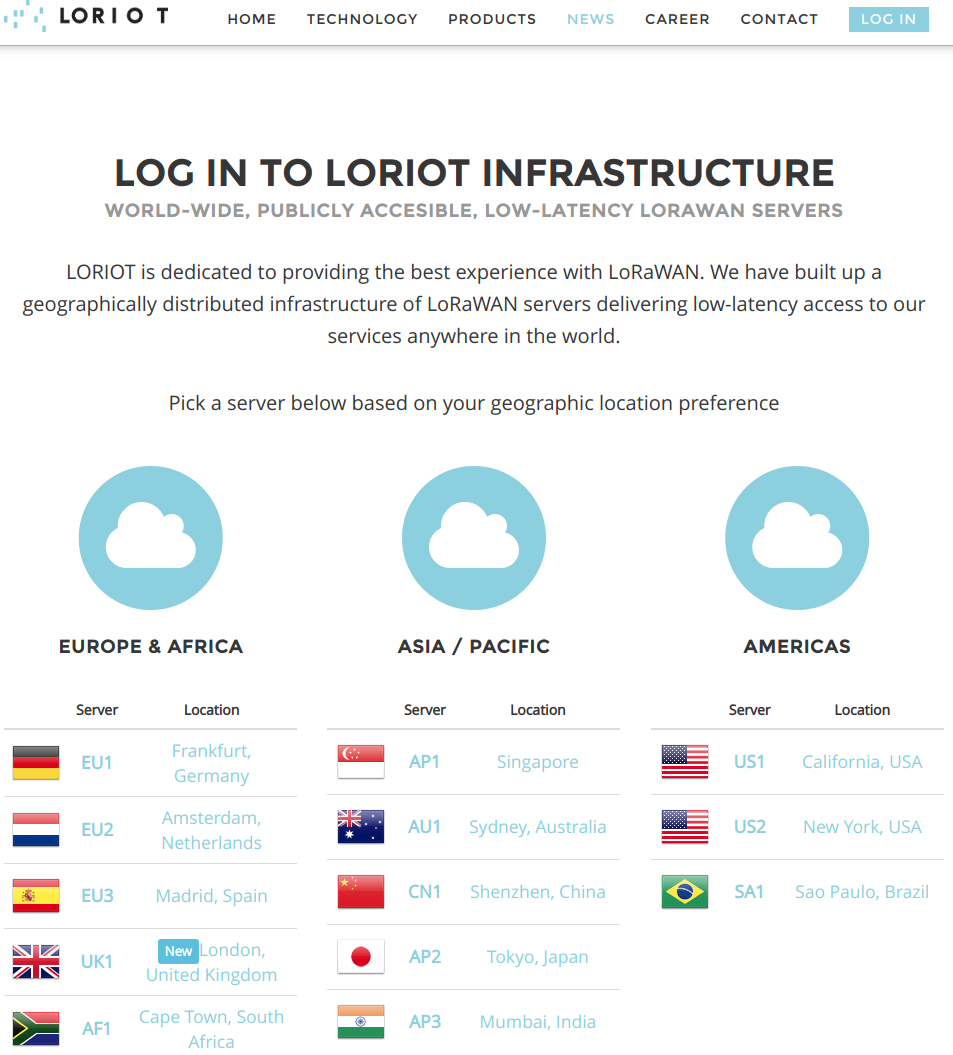
Log in
Log in in the Loriot platform, selecting your server location.
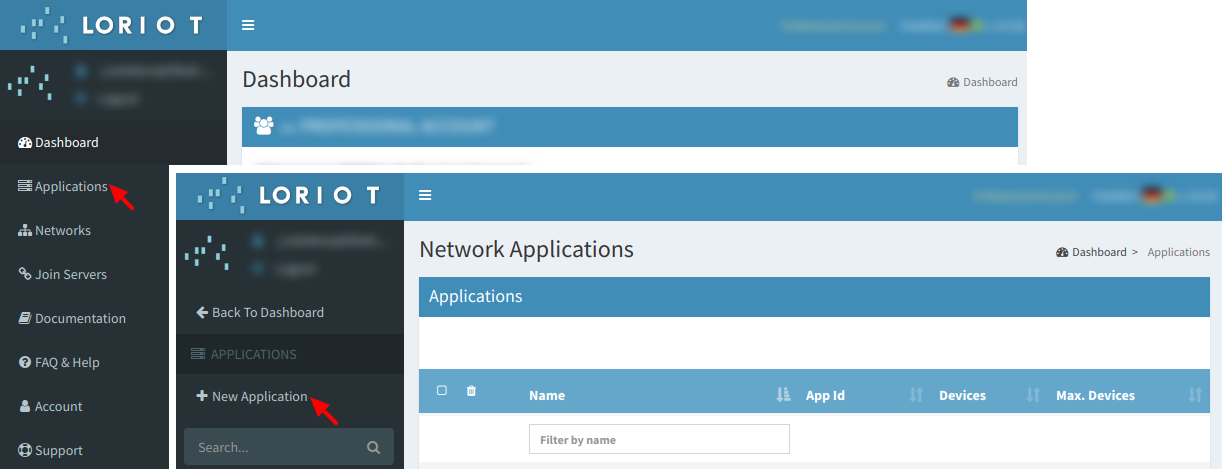
Create a new Loriot application
Once you selected the server location, a new prompt will be displayed asking your credentials. After logging in, users have to create a new application in the Loriot dashboard. To do this it is necessary to click on "Applications" in the left side bar and then in "New Application" option located in the same bar:
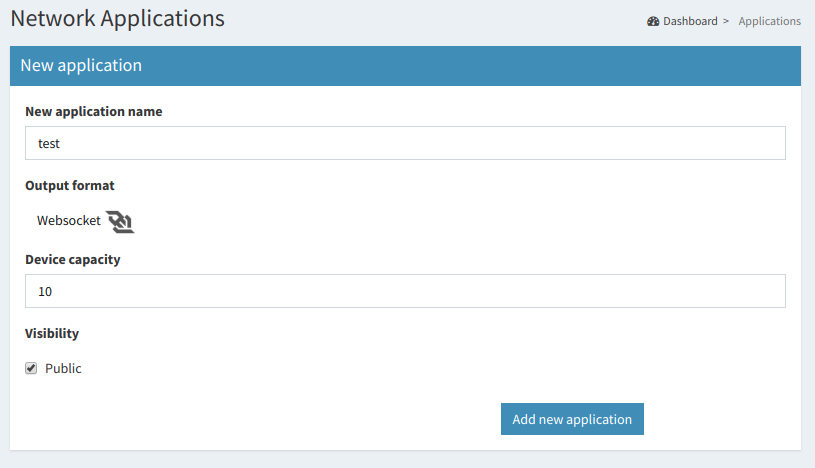
Fill the form in order to create the desired application in Loriot:
- New application name: Name to identify the application.
- Output format: "Websocket" is selected by default and it is not possible to change it in this form. How to change it will be explained in the following step.
- Device capacity: Maximum number of devices to be registered in this application. The maximum value will depend on the account type you have.
- Visibility: This checkbox permits to set the application as "public" or "private".
Output data: Libelium Cloud URL
Once the application is created, the dashboard will be shown. Go to "Application Outputs" -> click on "Manage outputs" -> click on "Add new output":

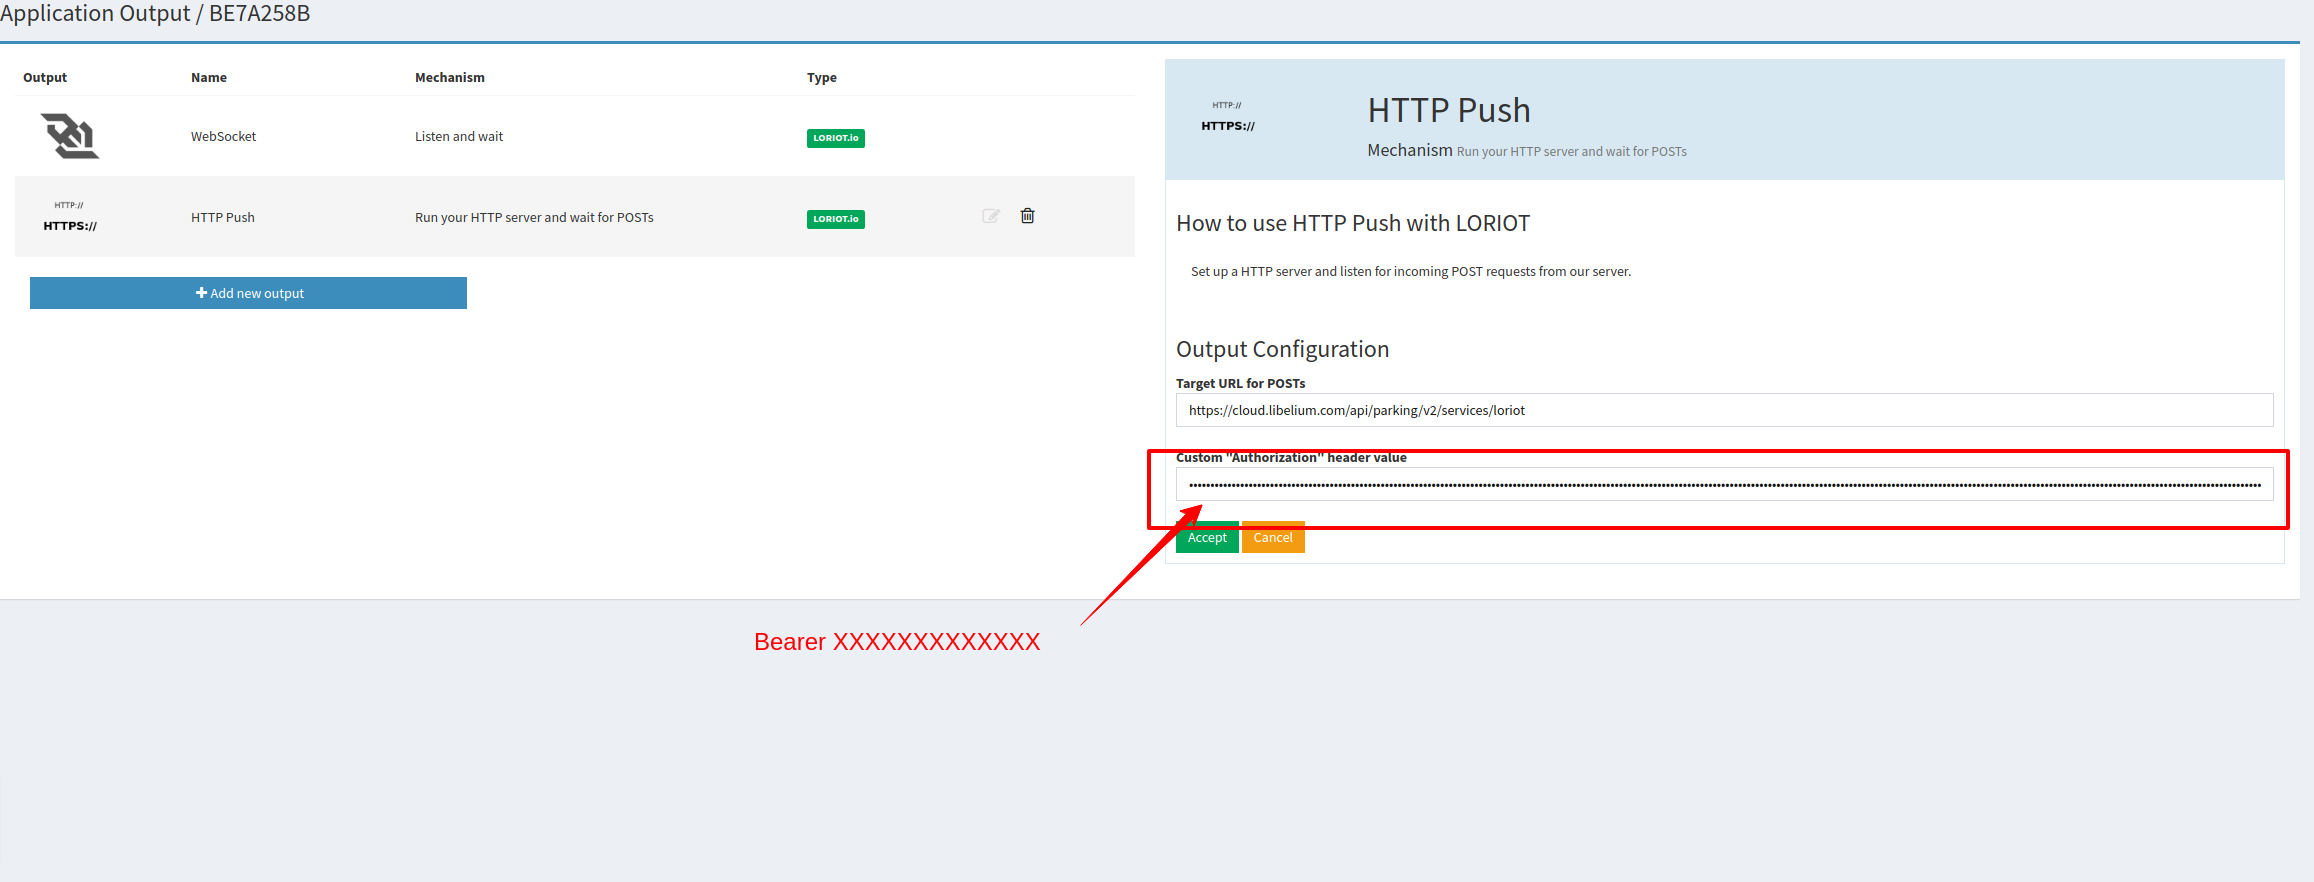
Select "HTTP Push" from the list and fill the form displayed on the right side. In the "Target URL for POSTs" field, write the URL where Loriot must send data to (https://api.libelium.com/cloud/parking/v2/services/loriot). Besides, users can add an authorization header in "Custom Authorization header value" in order to increase the security in the communications, so the final server only accepts the information from an authorized account. Finally, click on the "Confirm change" button to save the information.
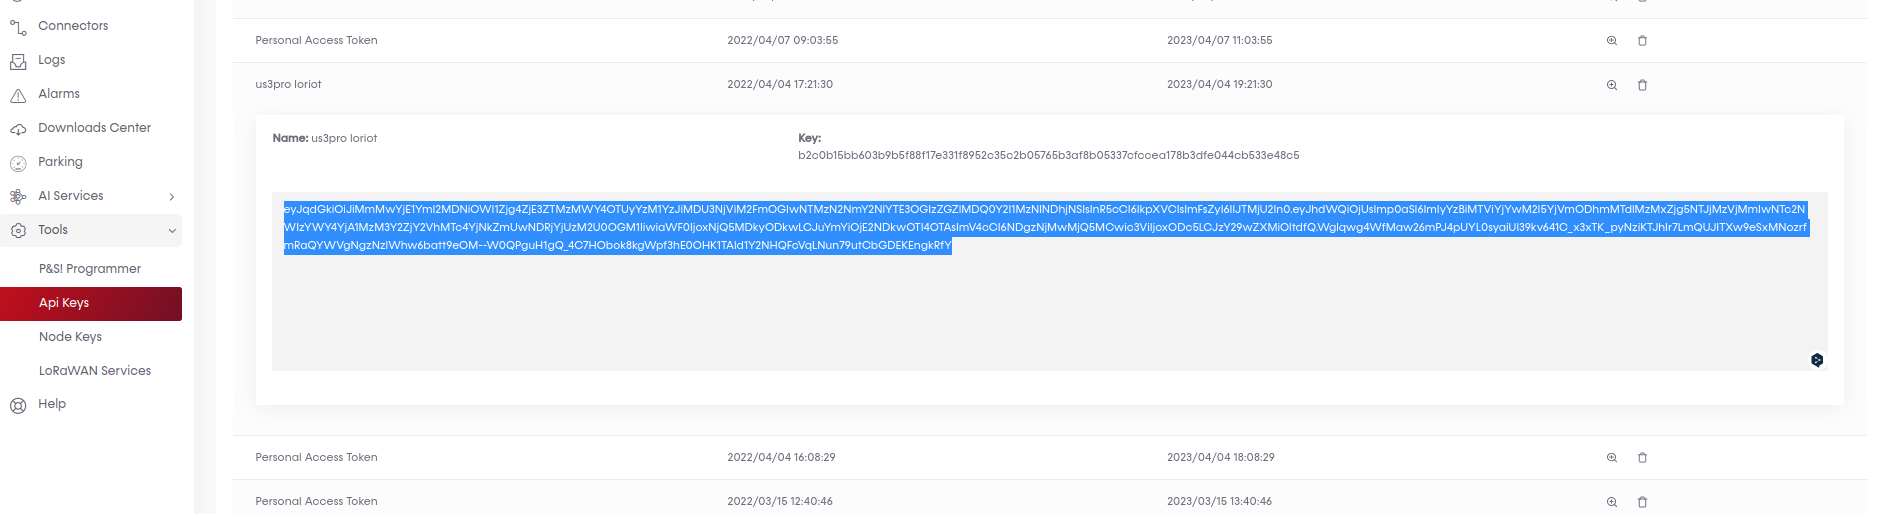
For that purpose, you can generate your own Libelium API key in the corresponding Cloud section:
How to delete unused Loriot applications
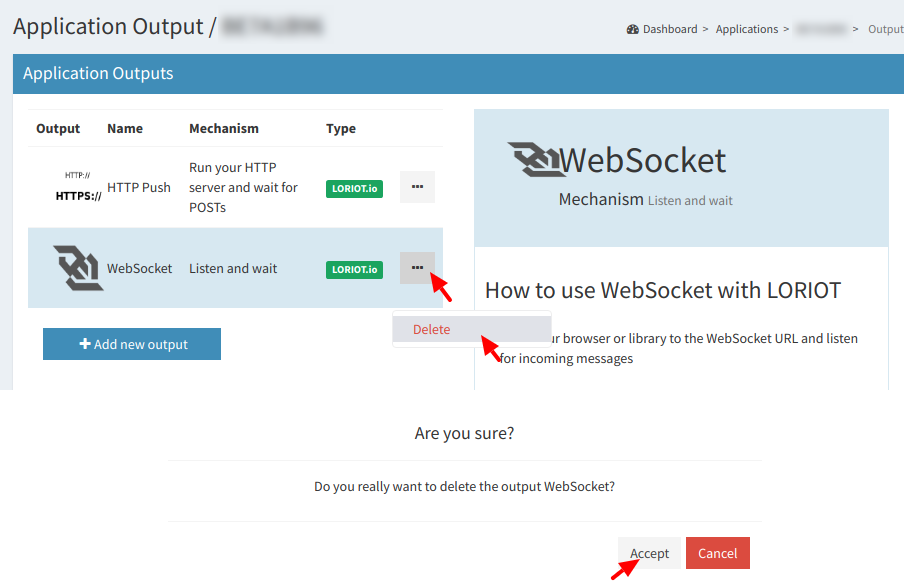
A list with all application outputs will be displayed in the "Application Outputs" window. It is recommended to delete unused outputs and keep only "HTTP Push" in the list. The procedure to delete all other applications is to click on the desired ellipsis button of the application "..." and select "Delete" option. A pop-up window will ask you to confirm the operation.
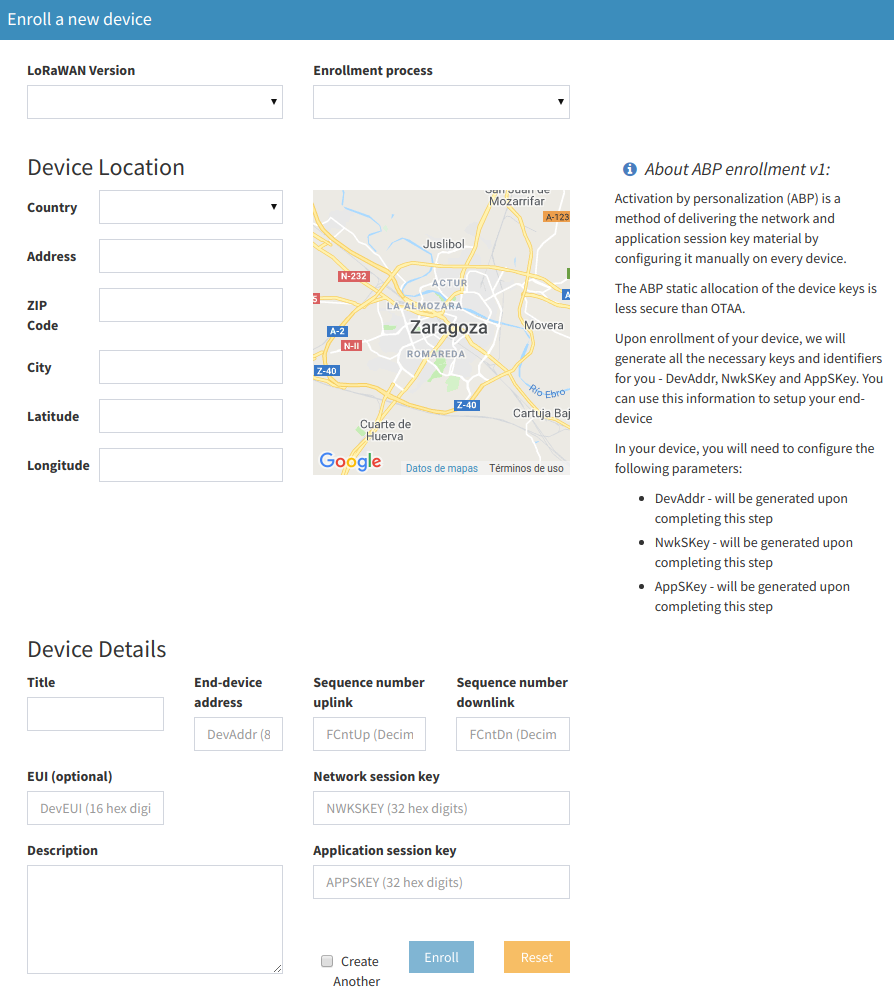
How to create a single device manually
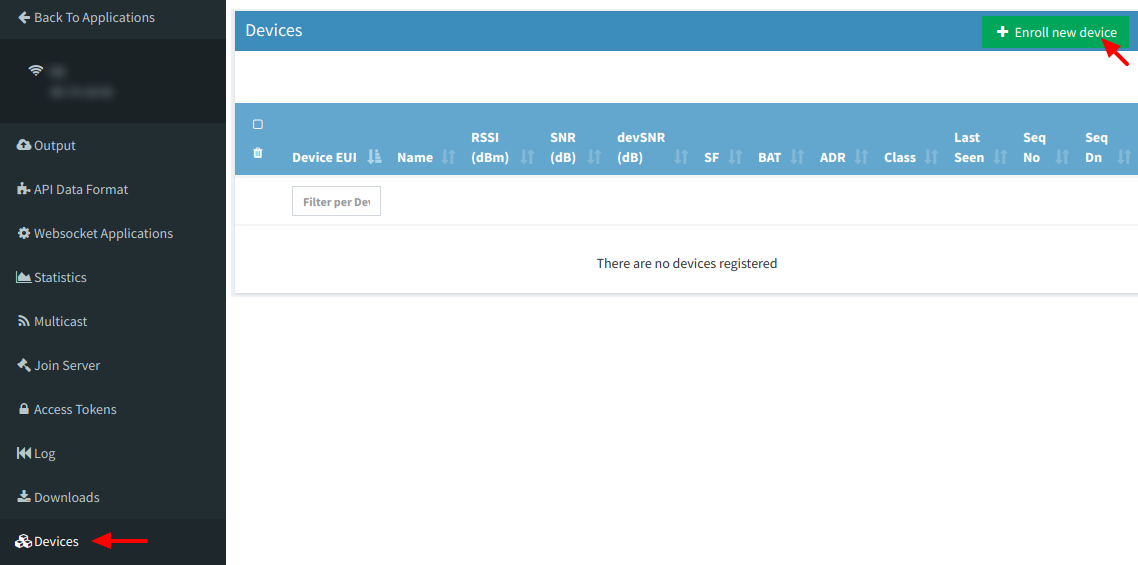
Click on "Devices" left menu to show the device list. Click on "Enroll new device" button to add a new device:
A new form will be displayed in order to create the new device associated to the application. In this form it is possible to choose different enrolling processes based on OTAA or ABP. So, depending on the option chosen, it will be mandatory to insert different EUIs or keys. Please refer to "LoRaWAN protocol and parameters" to understand the all parameters involved in this form.
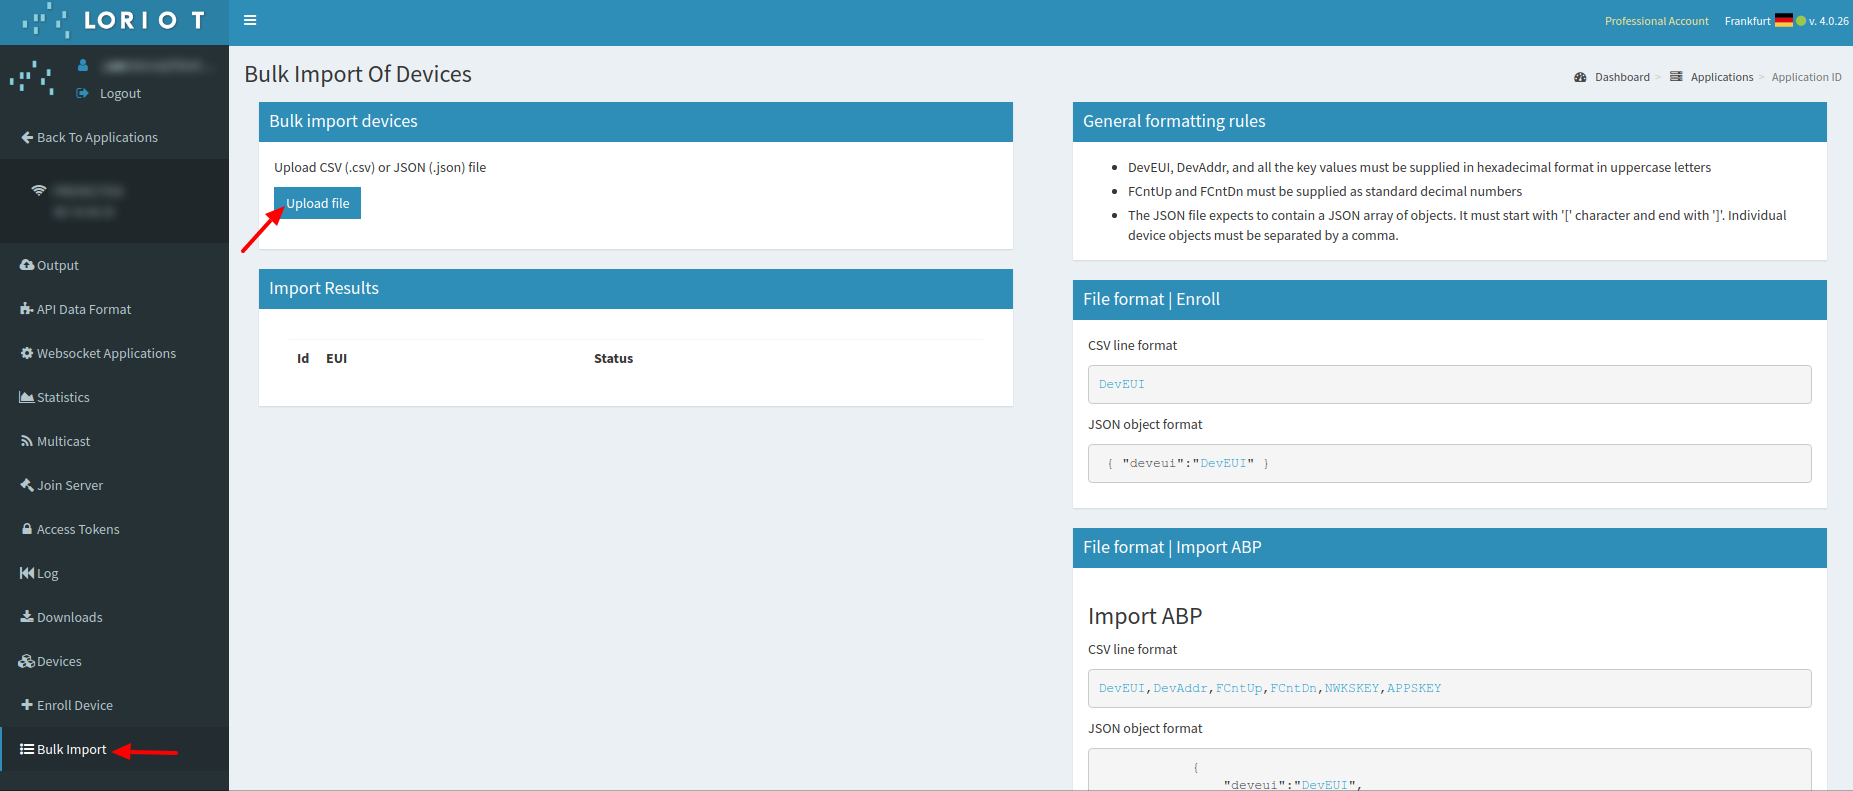
Nodes batch provisioning in Loriot
Inside the Loriot application click on "Bulk import" and then click on "Upload file" to register several devices at a time. It asks for a CSV file which must be exported from the SCM.
Please refer to "Libelium Cloud" section for further information on how to export this CSV file which includes all nodes OTAA credentials needed for direct batch import.
The CSV file for 'N' devices must respect the next format:
<DevEUI_1>,<AppEUI_1>,<AppKey_1>,<Serial_1>
<DevEUI_2>,<AppEUI_2>,<AppKey_2>,<Serial_2>
<DevEUI_3>,<AppEUI_3>,<AppKey_3>,<Serial_3>
...
<DevEUI_N>,<AppEUI_N>,<AppKey_N>,<Serial_N>
Actility
This section explains how to route information on Actility to Libelium Cloud using the HTTPS protocol. Firstly, you must access into the Actility's ThingPark portal and log in. IN the main portal, you must go to "ThingPark Application" section and access to "Device Manager":
<img src="/images/docs/parking-v2/parking_038.png" alt="Access to "Device Manager" menu" style="width:100%;" >
Actility requires an "Application Server" and an "AS routing profile" in order to establish the communication with Libelium Cloud. These 2 elements are required before starting the service the 1st time, and will be the base to create new devices.
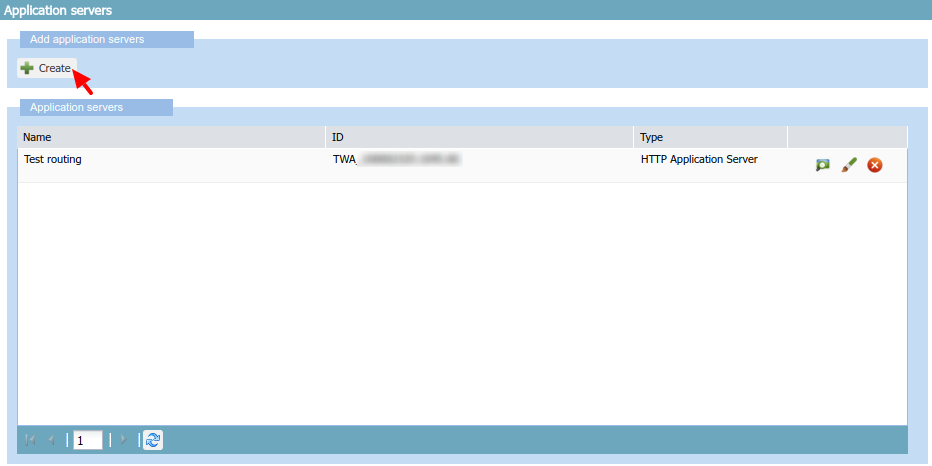
How to create a new Application Server
Starting from the main ThingPark Device Manager window, you shall create a new "Application Server" by clicking on "Application Servers":
The first section allows you to create a new "Application Server". Then the second section shows a list of all "Application servers" created. Click on the "Create" button in the first section to create a new "Application Server":
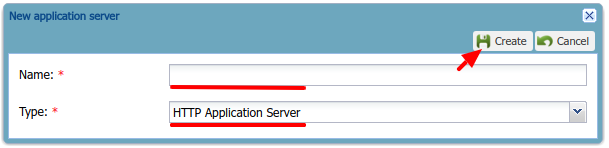
In "Name" field define your Application server name. In "Type" field, you must select "HTTP Application Server". Finally, click on the "Create" button to continue:
A new window appears, where the name is copied from the previous pop-up. In the "Content Type" field you must select "JSON". Then click on the "Add" button in "Add a route" section to create the link to the callback server installed:
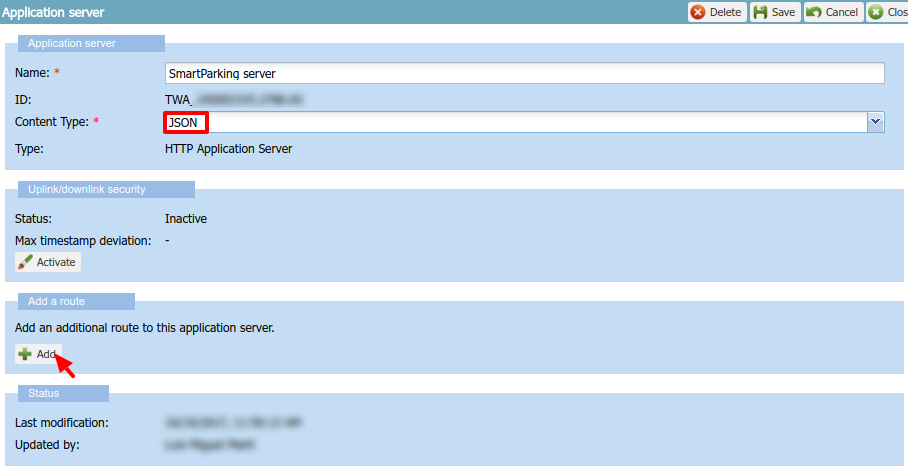
A "Route" section will be generated with a new form to be completed. Just click the "Add" button to proceed:

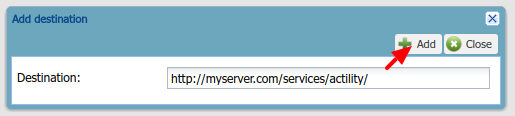
A new pop-up appears. In the "Destination" field, you must enter the URL of the server where the data is going to be sent (https://api.libelium.com/cloud/parking/v2/services/actility). Click on the "Add" button to save the information:
Navigate back to the Application server form, click on "Save" in order to create the "Application server".
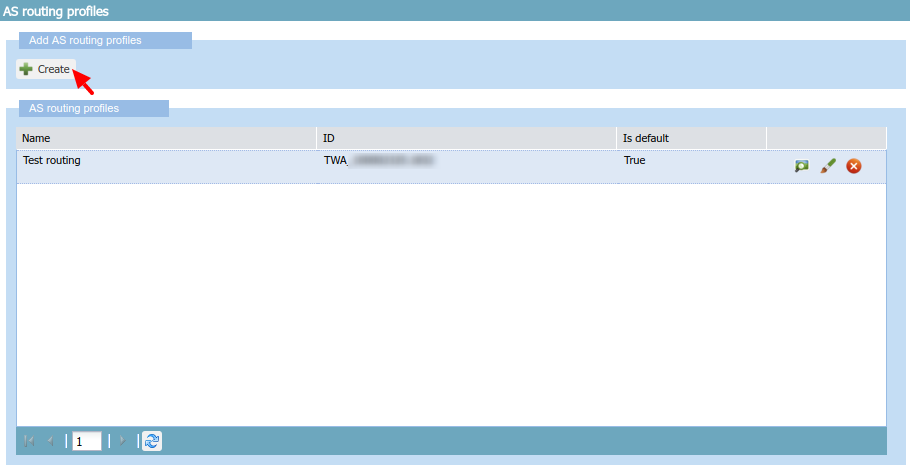
How to create a new AS routing profile
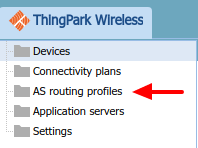
The Application Server (AS) routing profile defines how a previously created "Application server" will behave. In order to create a new "AS routing profile" in the Device Manager, click on "AS routing profiles" button on the left sidebar menu:
Then you must click on the "Add" button in the first section. Below, in the second section, a list with all existing "AS routing profiles" will be displayed:
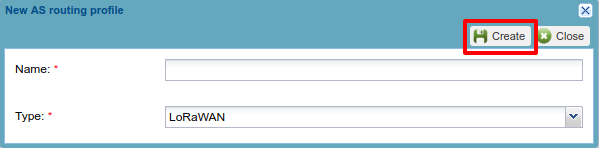
In the "Name" field write the name of the AS routing profile. In the "Type" field, select LoRaWAN. Then click on the "Create" button to continue the process:
In the new window, you can read the "AS routing profile ID" which will be needed for batch import. Besides, mark the check "Is default" and click the "Add button":
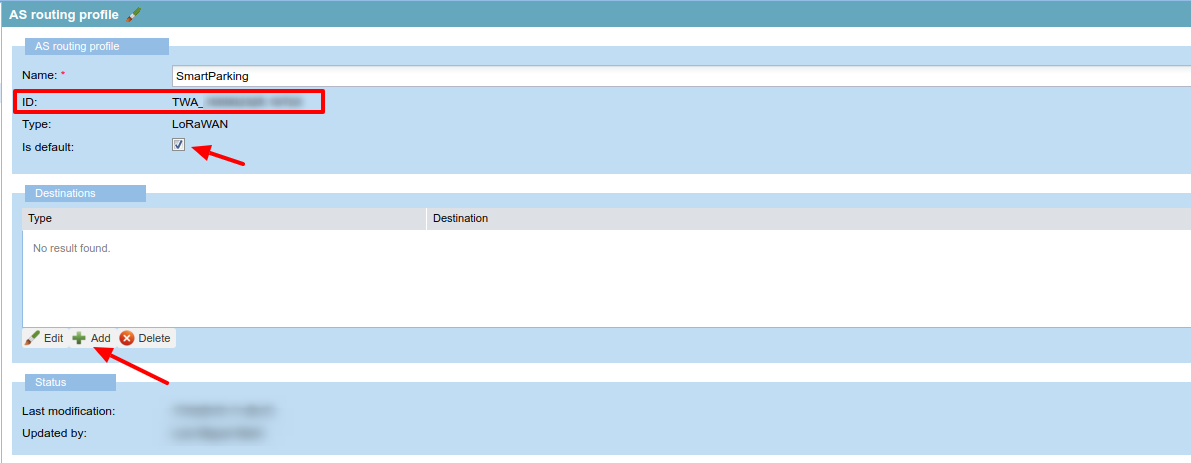
A new pop-up will appear with 2 parameters to be completed. "Type" is the kind of the application for our destination, "Local application server" must be selected. In the "Destination" drop-down field, all available Application servers will be displayed. So, the correct "Application server" previously created must be selected:

Navigate back to the AS routing profile form, click on "Save" in order to create it. This process should be completed just once. From this moment, customers can add devices to the service.
How to create new devices manually
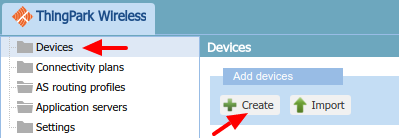
Once created the "Application server" and "AS routing profile", you can create new devices. In the main ThingPark menu, click on "Devices" option . Then click on the "Create" button:
A new form will be displayed in order to define the new device's parameters:
Administrative data
- Device name: Name to identify the device
- Marker: Icon to identify the device on the map list
- Administrative info: Relevant information of the device
- Administrative location: Location of the device
- Motion indicator: List with several options
Device identification
- Manufacturer: Select "Generic".
- Model: Select the corresponding region:
- LoRaWAN EU863-870: LORA/GenericA.1.0.2a_ETSI_Rx2-SF12
- LoRaWAN US902-928: LORA/GenericA.1.0.2a_FCC_Rx2-SF12
- LoRaWAN IN865-867: LORA/GenericA.1revB_IN865_Rx2-SF12
- LoRaWAN AU915-928: LORA/GenericA.1revB_AU915_Rx2-SF12
- LoRaWAN AS923: LORA/GenericA.1_AS923_Rx2-SF10
- Device activation: Select "Over The Air Activation (OTAA)" if default parameters are used. ABP is the other option.
- DevEUI: Device EUI, globally unique IEEE EUI-64 address.
- AppEUI: Device Application identifier (mandatory for OTAA).
- Key format: Should be "Clear text" for non-encrypted key format.
- AppKey: 16-byte Application Key (mandatory for OTAA).
Network parameters
- Connectivity plan: Select a Connectivity plan on the drop-down menu.
- DevAddr: Select "Allocated by the network server".
Application layer handling
- Application server routing profile: Select the "Application server" created before.
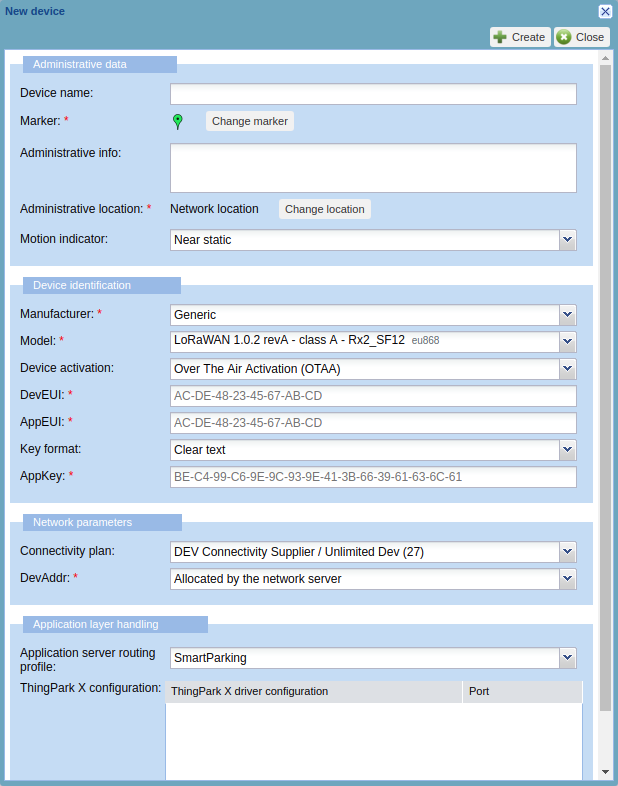
Finally click on the "Create" button in order to save the information of the device.
Nodes batch provisioning in Actility
It is possible to register several nodes at a time using the "Import" button:
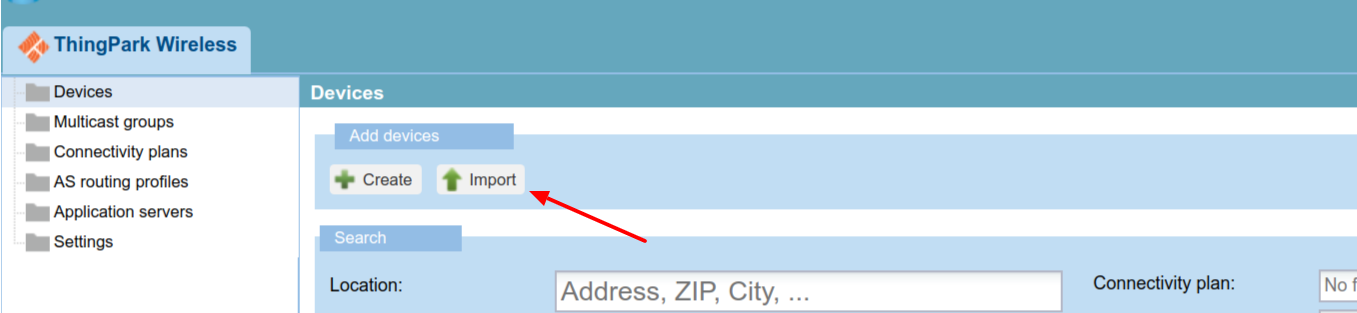
A new window is displayed in order to import a CSV file with all devices to be imported:

Regarding the CSV file format, you must start from the exported CSV file from the SCM. Please refer to "Libelium Cloud management" section for further information on how to export this CSV file which includes all nodes OTAA credentials needed for direct batch import. Then, you must keep in mind that Actility needs more information to be included in that CSV file. The CSV to be imported must follow the next format (15 columns).
The CSV file for 'N' devices must respect the next format:
CREATE_OTAA,<DevEUI1>,,<DevProfile>,<AppEUI1>,<AppKey1>,,,<AS_profile_ID>,<ConnPlan>,<name>,,,,,
CREATE_OTAA,<DevEUI2>,,<DevProfile>,<AppEUI2>,<AppKey2>,,,<AS_profile_ID>,<ConnPlan>,<name>,,,,,
CREATE_OTAA,<DevEUI3>,,<DevProfile>,<AppEUI3>,<AppKey3>,,,<AS_profile_ID>,<ConnPlan>,<name>,,,,,
...
CREATE_OTAA,<DevEUIN>,,<DevProfile>,<AppEUIN>,<AppKeyN>,,,<AS_profile_ID>,<ConnPlan>,<name>,,,,,
Where:
- CREATE_OTAA: Should always be the same in order to import the devices using OTAA join mode.
- \
: This is the Device EUI exported from Libelium SCM CSV file. Should not be changed. -
\
: This field is related to the LoRaWAN region of the node. Possibilities depending on the version: - LoRaWAN EU863-870: LORA/GenericA.1.0.2a_ETSI_Rx2-SF12
- LoRaWAN US902-928: LORA/GenericA.1.0.2a_FCC_Rx2-SF12
- LoRaWAN IN865-867: LORA/GenericA.1revB_IN865_Rx2-SF12
- LoRaWAN AU915-928: LORA/GenericA.1revB_AU915_Rx2-SF12
- LoRaWAN AS923: LORA/GenericA.1_AS923_Rx2-SF10
- \
: This is the Application EUI exported from Libelium SCM CSV file. Should not be changed. - \
: This is the Application Key exported from Libelium SCM CSV file. Should not be changed. - \
: This is Actility's "AS routing profile ID" which belongs to each customer's account. It can be read from the profile when it is first created. - \
: This must be set as "dev-cs/testing". - \
: Name of each device (optional).
Example for some Smart Parking EU nodes (LoRaWAN EU863-870). Let's assume TWA_123 was the "AS routing profile ID" given by Actility for our application:
Libelium Base Station
This section explains how to route information on a Libelium Base Station to Libelium Cloud using third party Network Servers.
Supported LoRa Network Servers
This LoRaWAN Gateway can be configured in several ways to route LoRa data to different Network Servers.
This section is focused on the configuration of the gateway to connect to Libelium's Cloud through the Loriot Network server.
The Manufacturer's documentation might help customers from the very first moment to access to the device and deploy their own network here.
Configure LoRaWAN Network Settings
In order to connect to Loriot the Semtech Packet Forwarder installed in the gateway. It can be selected and configured in the LoRa Network -> Nertwork Settings section.
The Server address will be the same where the Network and Application of the customer's account is created.
Up and down port must be set to 1780.
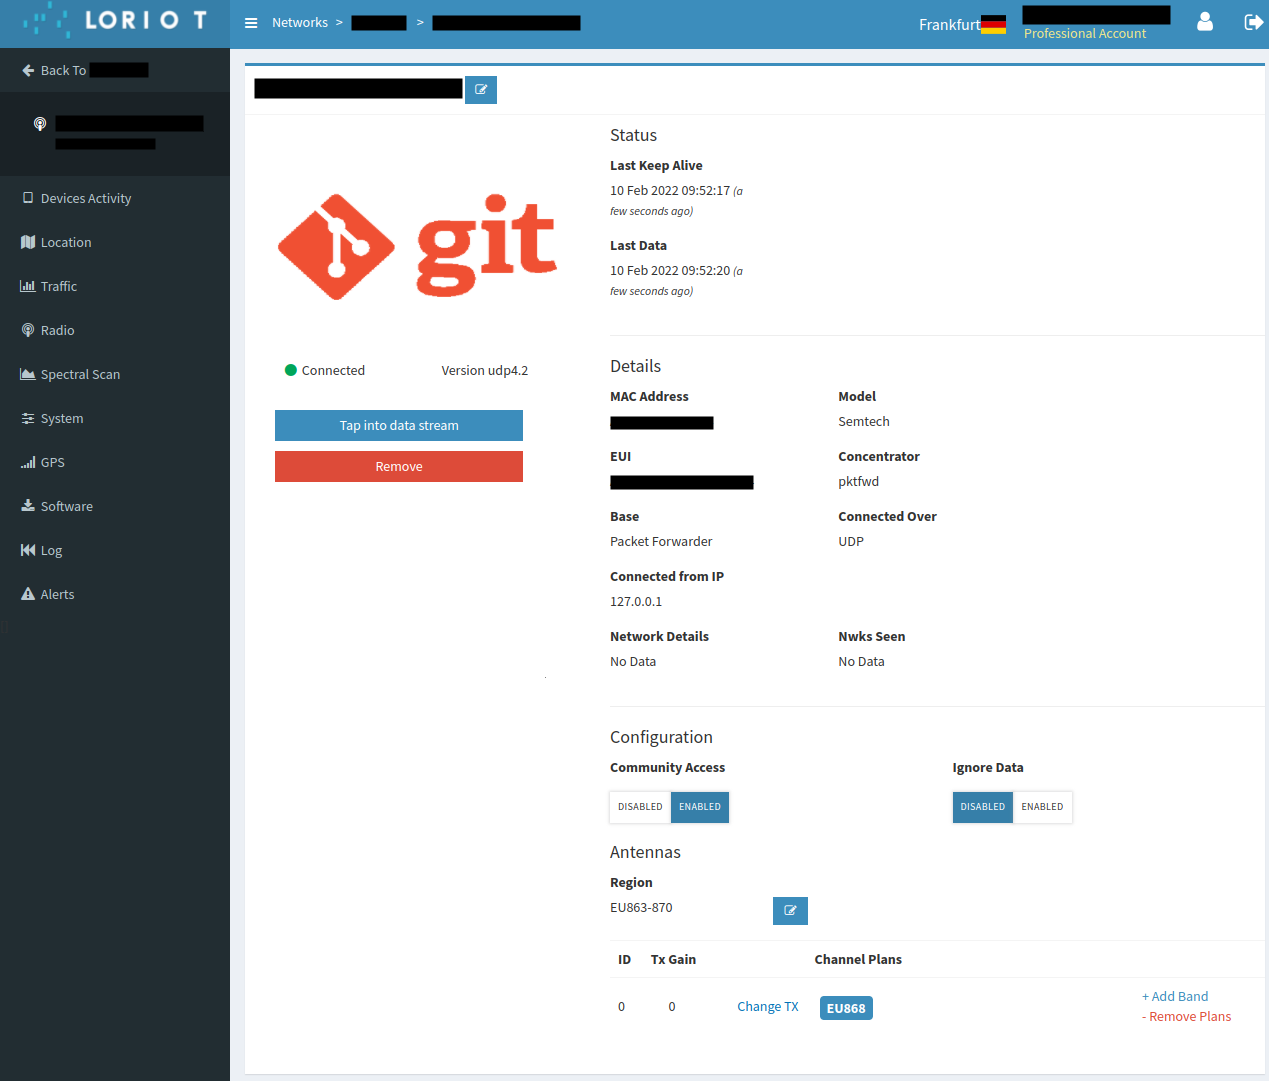
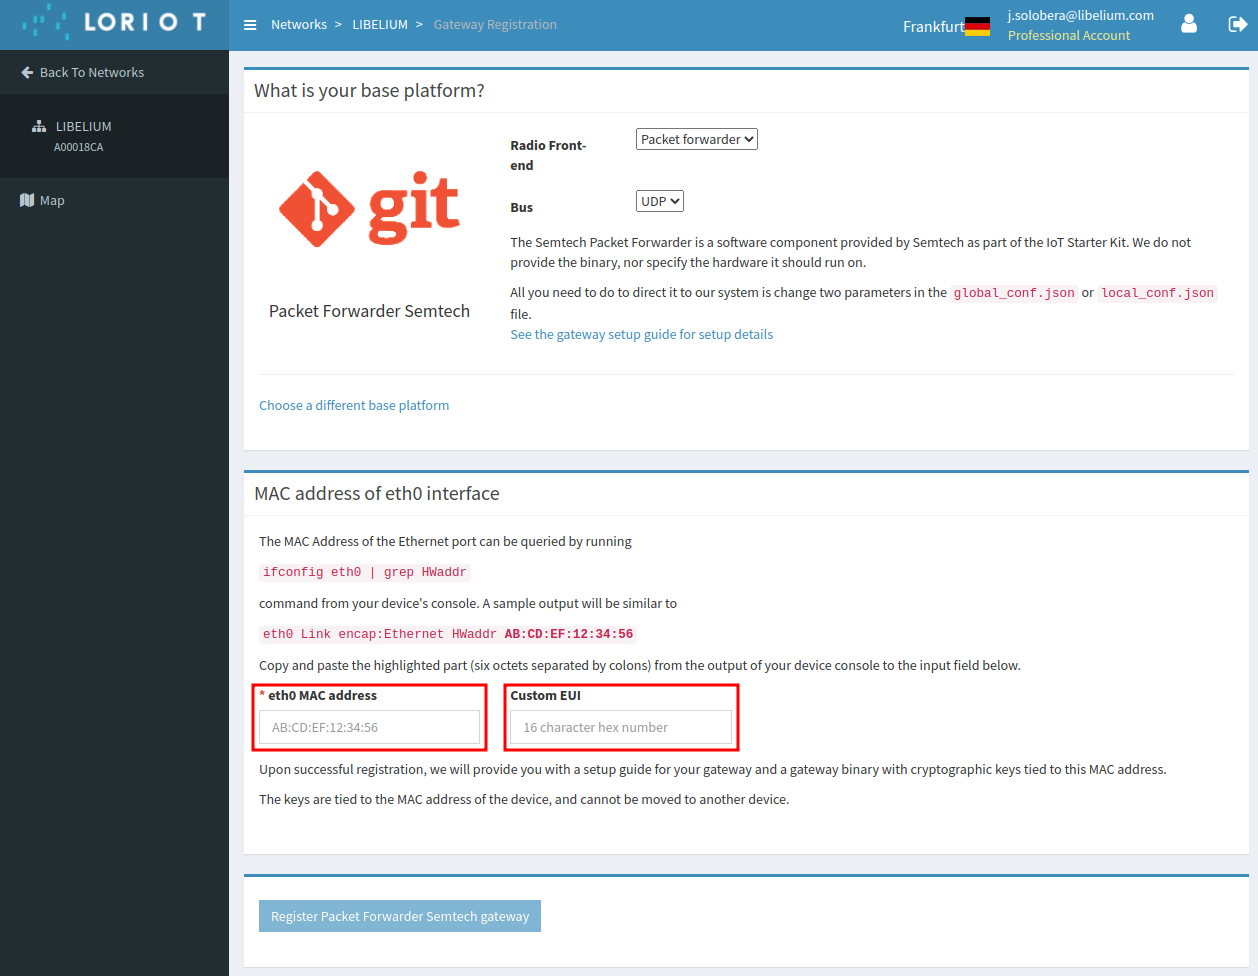
Register the gateway in Loriot
Adding a new gateway in Loriot provides several models, amongst which the user must chose. Although this gateway model is not among them, the Semtech Packet Forwarder is available for the user to configure with this gateway:
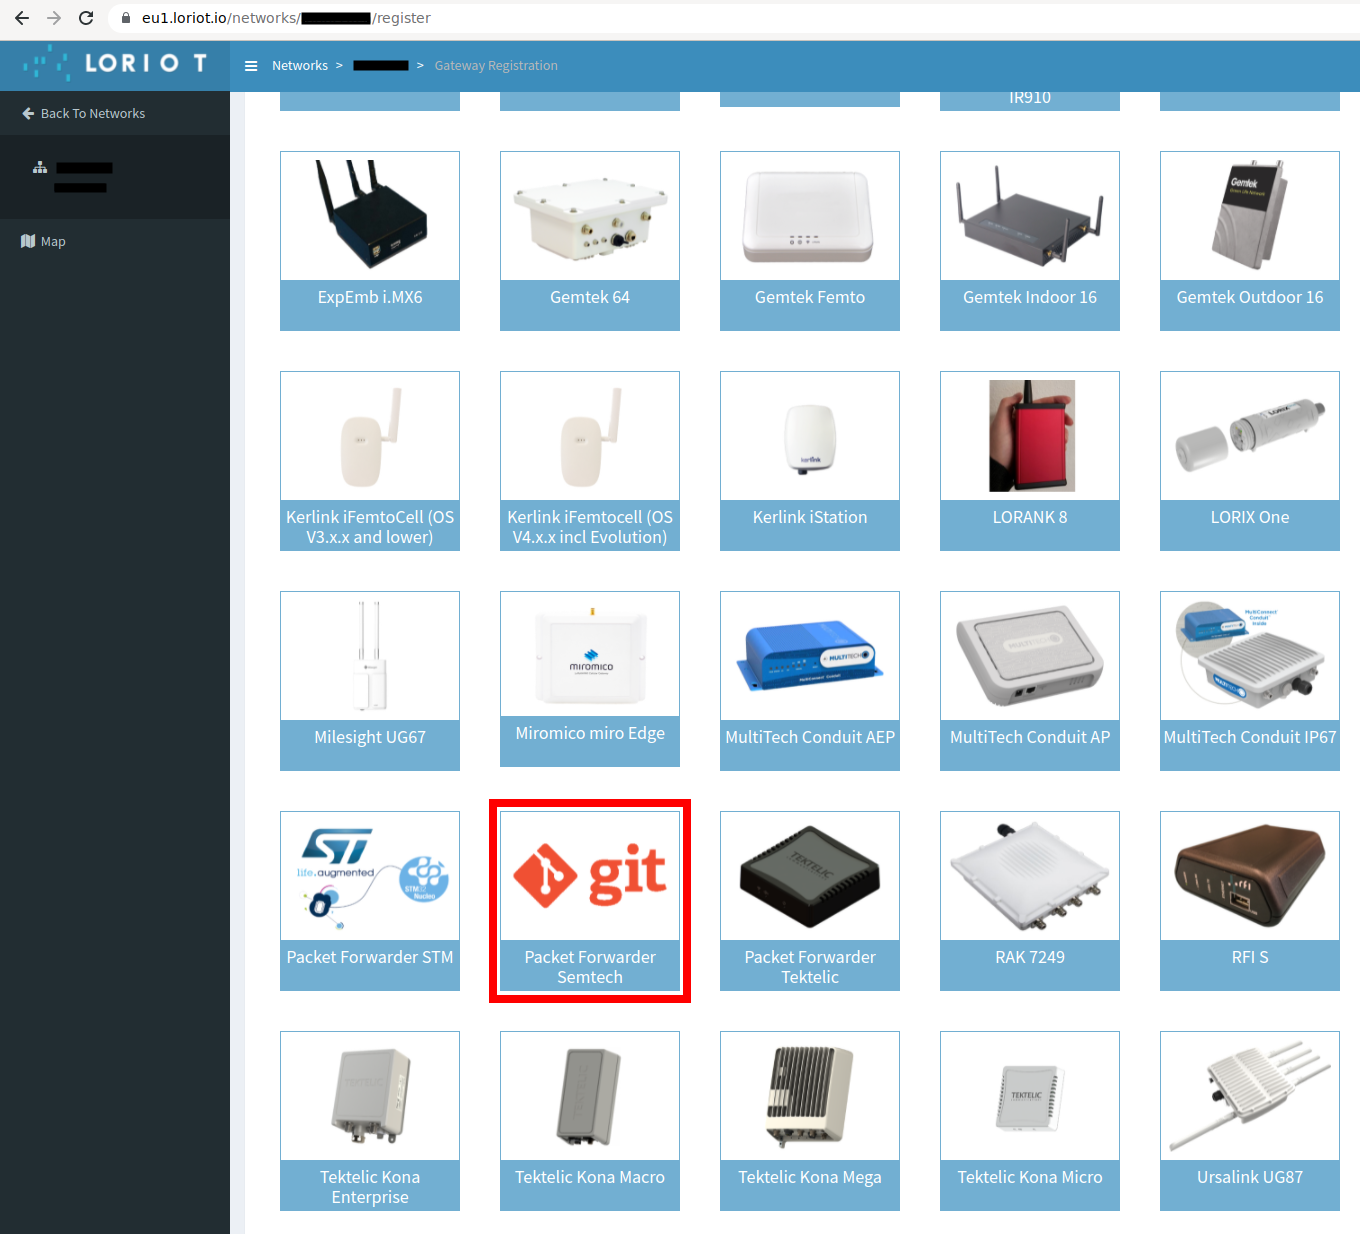
To connect the gateway to Loriot, the physical MAC address and Gateway EUI must be set in the register process.
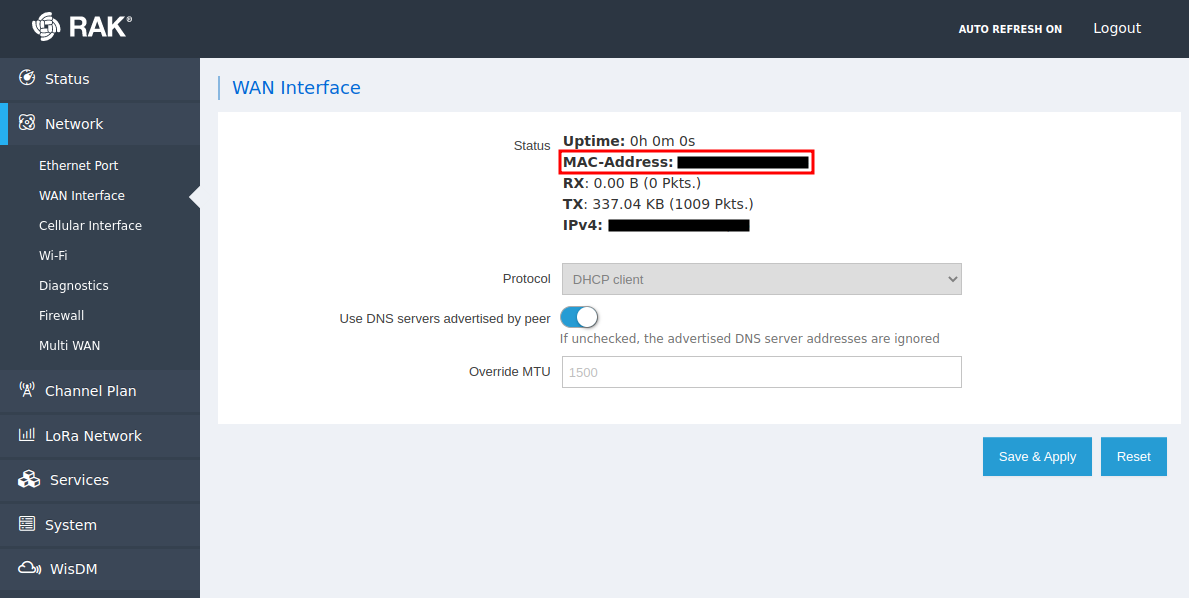
The device MAC adress can be found in the Network -> WAN Interface section.
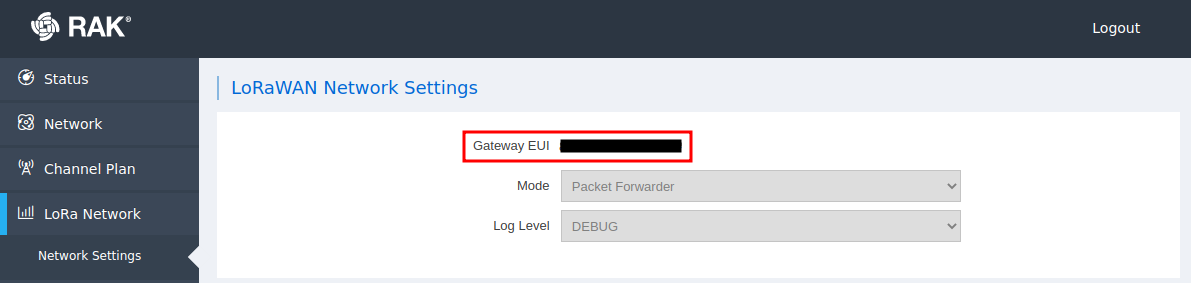
The Gateway EUI can be found in the LoRa Network -> Network Settings section.
After registration, frecuency plan can be configured in the gateway section.