- Meshlium Configuration
- Using the Edge MicroServer (EMS)
- ThingWorx platform configuration
- Publish Remote Things
- Troubleshooting
ThingWorx
ThingWorx is the first software platform designed to build and run the applications of the connected world. ThingWorx reduces the time, cost, and risk required to build innovative Machine-to-Machine (M2M) and Internet of Things applications by providing a complete application design, runtime, and intelligence environment. The ThingWorx platform includes flexible device connectivity options, rapid application development tools, scalable storage, and supports various deployment models.
More information: http://www.thingworx.com.
ThingWorx includes the following features:
- *ThingWorx Composer*™: an end-to-end application-modeling environment designed to help you easily build the unique applications of today's connected world. Composer makes it easy to model the Things, Business Logic, Visualization, Data Storage, Collaboration, and Security required for a connected application.
- Codeless Mashup Builder: a "drag and drop" Mashup Builder empowers developers and business users to rapidly create rich, interactive applications, real-time dashboards, collaborative workspaces, and mobile interfaces without the need for coding.
- Execution and Storage Engine: ThingWorx's event-driven execution engine and 3-Dimensional storage allows companies to make business sense of the massive amounts of data from their people, systems, and connected "Things" - making the data useful and actionable. It also features a data collection engine that provides unified, semantic storage for time-series, structured, and social data at rates 10X faster than traditional RDBs.
- Search-based Intelligence: ThingWorx SQUEAL™ (Search, Query, and Analysis) brings Search to the world of connected devices and distributed data. With SQUEAL's interactive search capabilities, users can correlate data that delivers answers to key business questions.
{warning.fa-dot} if you need more information about these components, go to http://www.thingworx.com/platform/
Meshlium Configuration
Inside the "ThingWorx" plugin you can setup which Waspmotes in the system will be published in ThingWorx server.
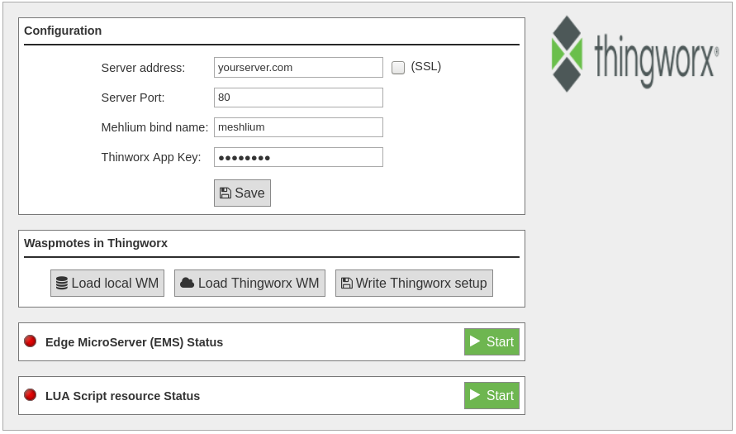
The parameters to setup are:
- Server address: The address of your ThingWorx server.
- Server Port: The port where your ThingWorx server is accessible.
- Meshlium bind name: The name of the Meshlium "thing" in ThingWorx. Meshlium thing is detected in ThingWorx but will not send any data.
- ThingWorx App Key: Security key to send data to your ThingWorx server.
- SSL: Enable this option if your ThingWorx server uses encrypted connection.
Click on the "Save" button to write this setup to the ThingWorx service.
The steps to setup Waspmotes to send to ThingWorx are:
- Click on the button "Load local WM". This will read Waspmotes that have data in the sensor database.

- A panel with the devices is displayed, with a list of the sensors received from each Waspmote.
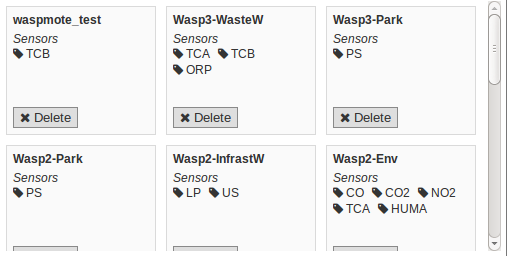
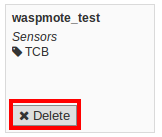
- It is possible to delete a Waspmote from the list clicking on its "Delete" button. This device will not be published to the ThingWorx platform.
- Once the list is correct, clicking on the button "Write ThingWorx setup" will push this setup to the ThingWorx EMS service.

After restarting the EMS and LUA Script services, the setup will be applied and you will see your devices in your ThingWorx server.
If you click again on the "Get Waspmotes from DB" button, the plugin will read again the DB and display all the Waspmotes. If you do not write this changes to ThingWorx setup, this will not propagate to the EMS service.
You can recover the current ThingWorx EMS service setup by clicking on the "Load WM from ThingWorx".

Using the Edge MicroServer (EMS)
ThingWorx has the ability to connect very quickly and easily to the physical world and structured data systems. ThingWorx supports a variety of communication protocols and system interfaces. Many are implemented directly on the ThingWorx Platform. However, for edge devices or data stores that need to connect to the platform using the Internet or through firewalls on an Intranet, ThingWorx provides an Edge MicroServer (EMS) solution that can be deployed where the data is, and allows secure, efficient communication back to the ThingWorx Platform. This section will concentrate on the EMS and the corresponding Edge Thing software components.
In order to send data to the ThingWorx environment, another component is needed: the LUA Script Resource service. This service needs to be running at the same time with Edge Micro Server to allow data acquisition.
To launch the Edge MicroServer (EMS) press Start button, and to stop it, press Stop button.


To launch the LUA Script resource press the Start button, and to stop it, press the Stop button.


ThingWorx platform configuration
Create the Application Key
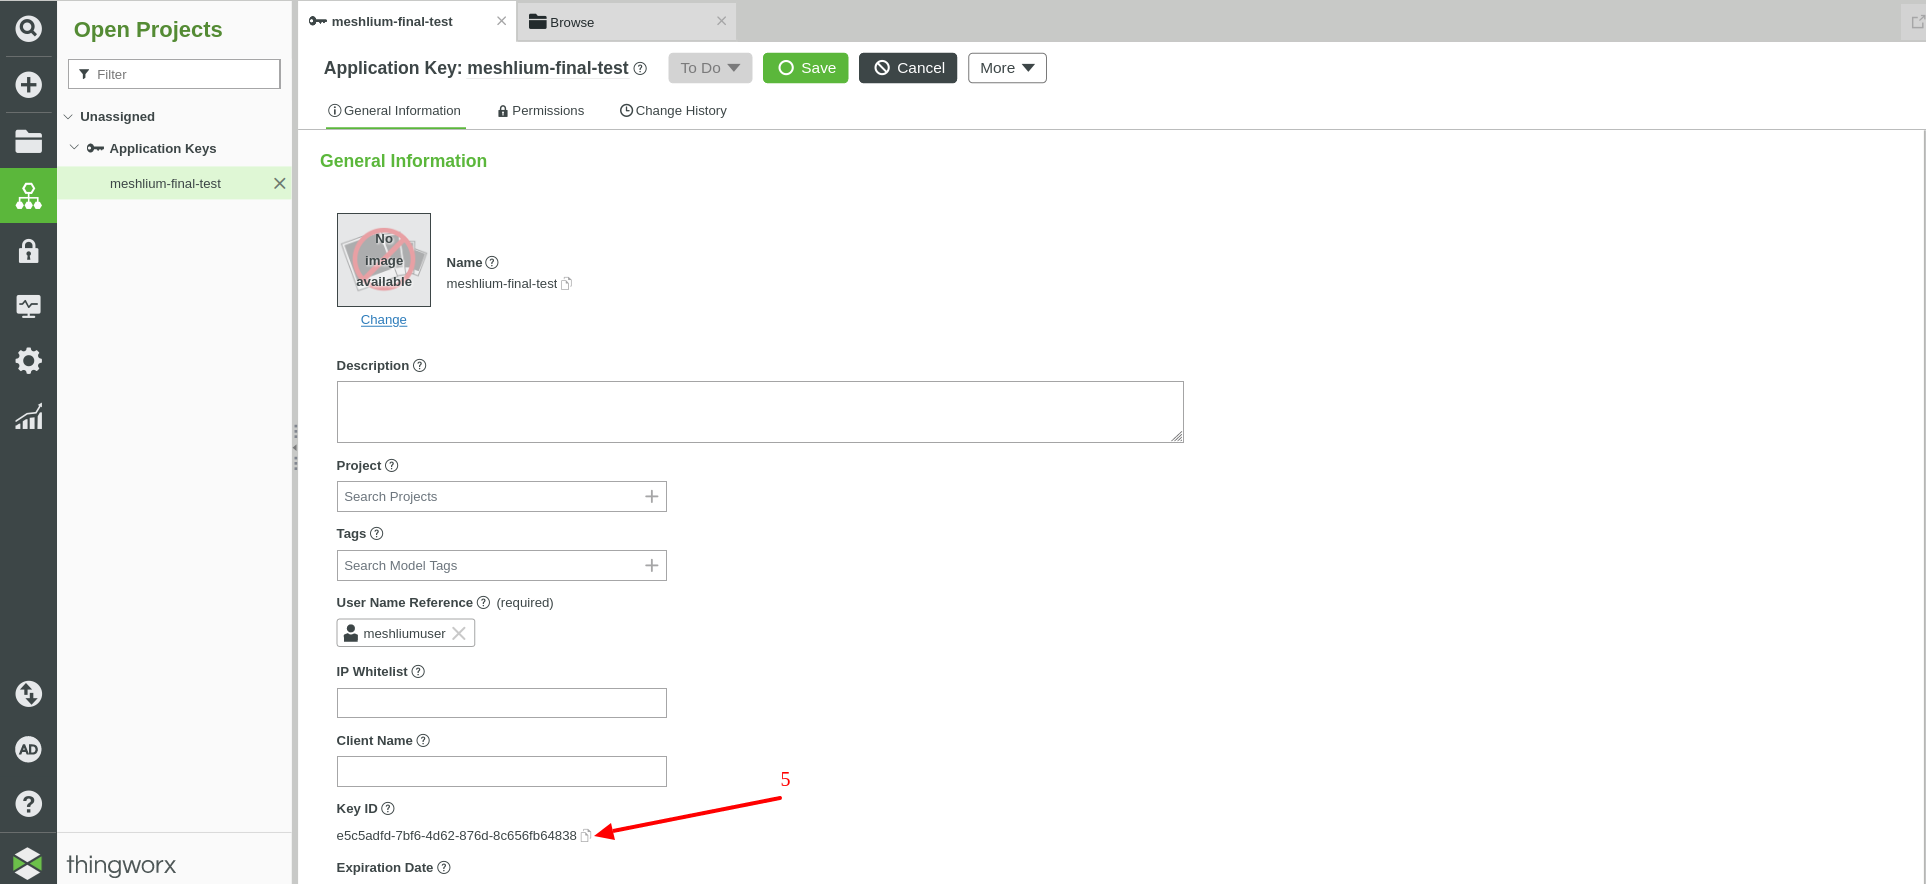
An Application Key is the authentication item used to send or receive data from your Thing. It is associated with a ‘tag' that is common to all of the components of your Thing.
In the home page of your ThingWorx Composer, go to Browse > Security > Application Keys. The click the "New" button.
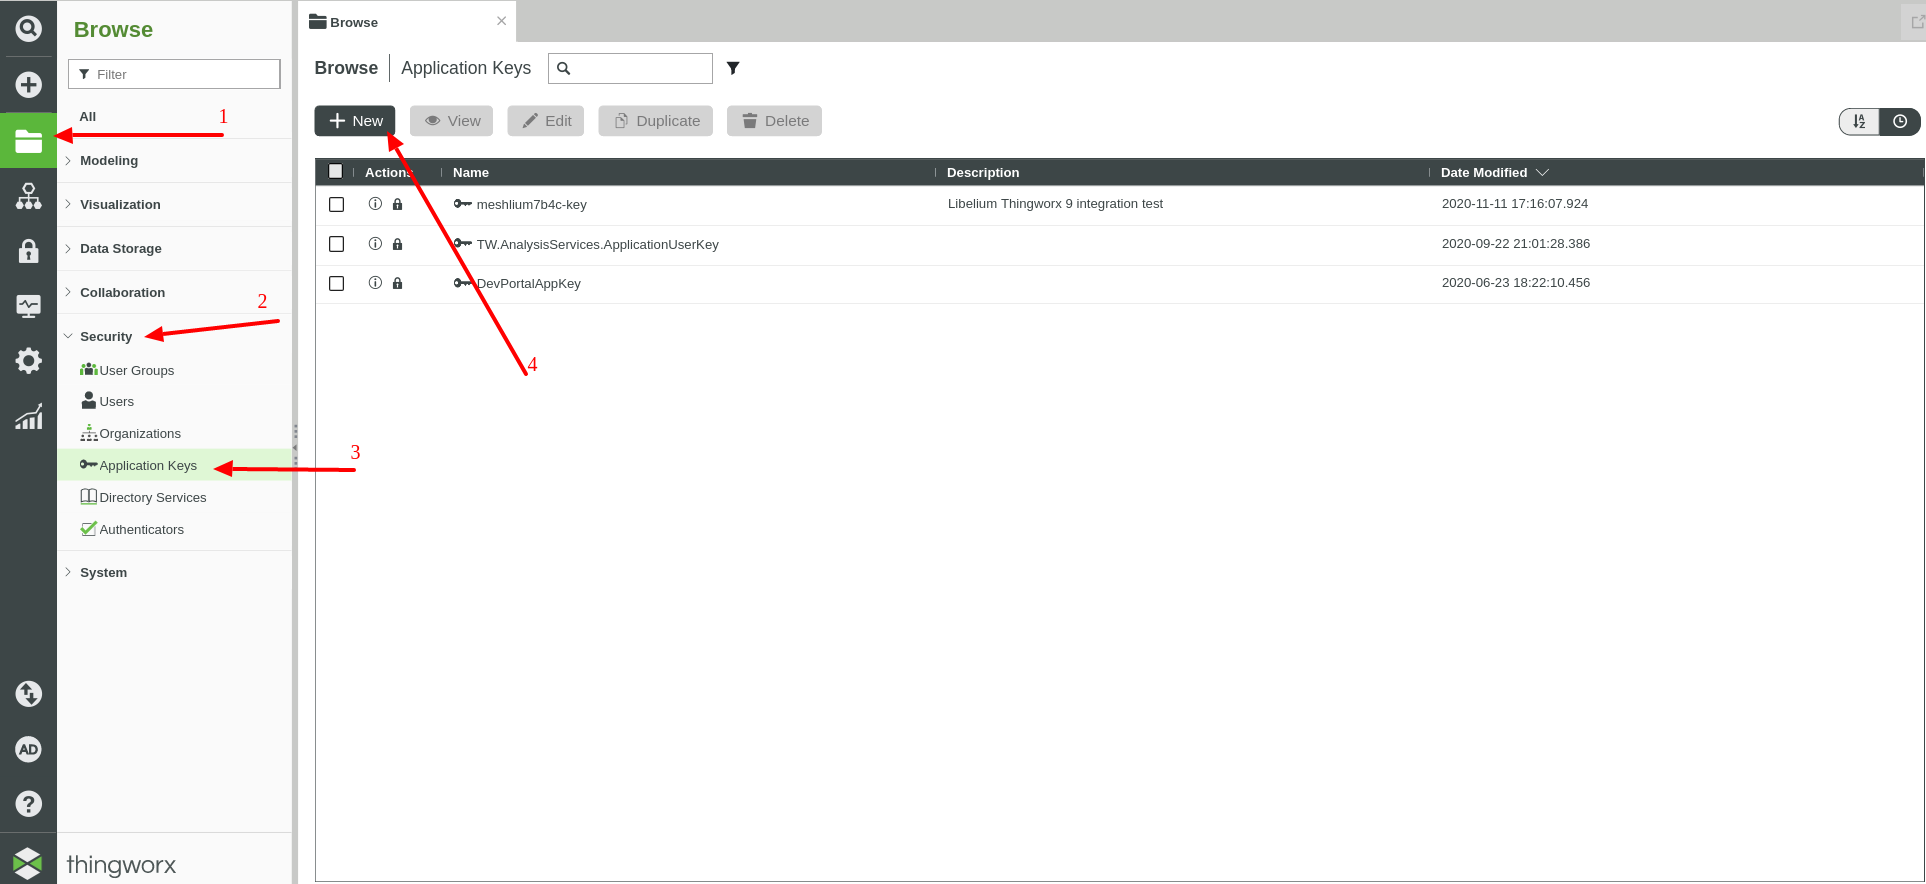
In the Application Key page:
- Type a Name for the Application Key
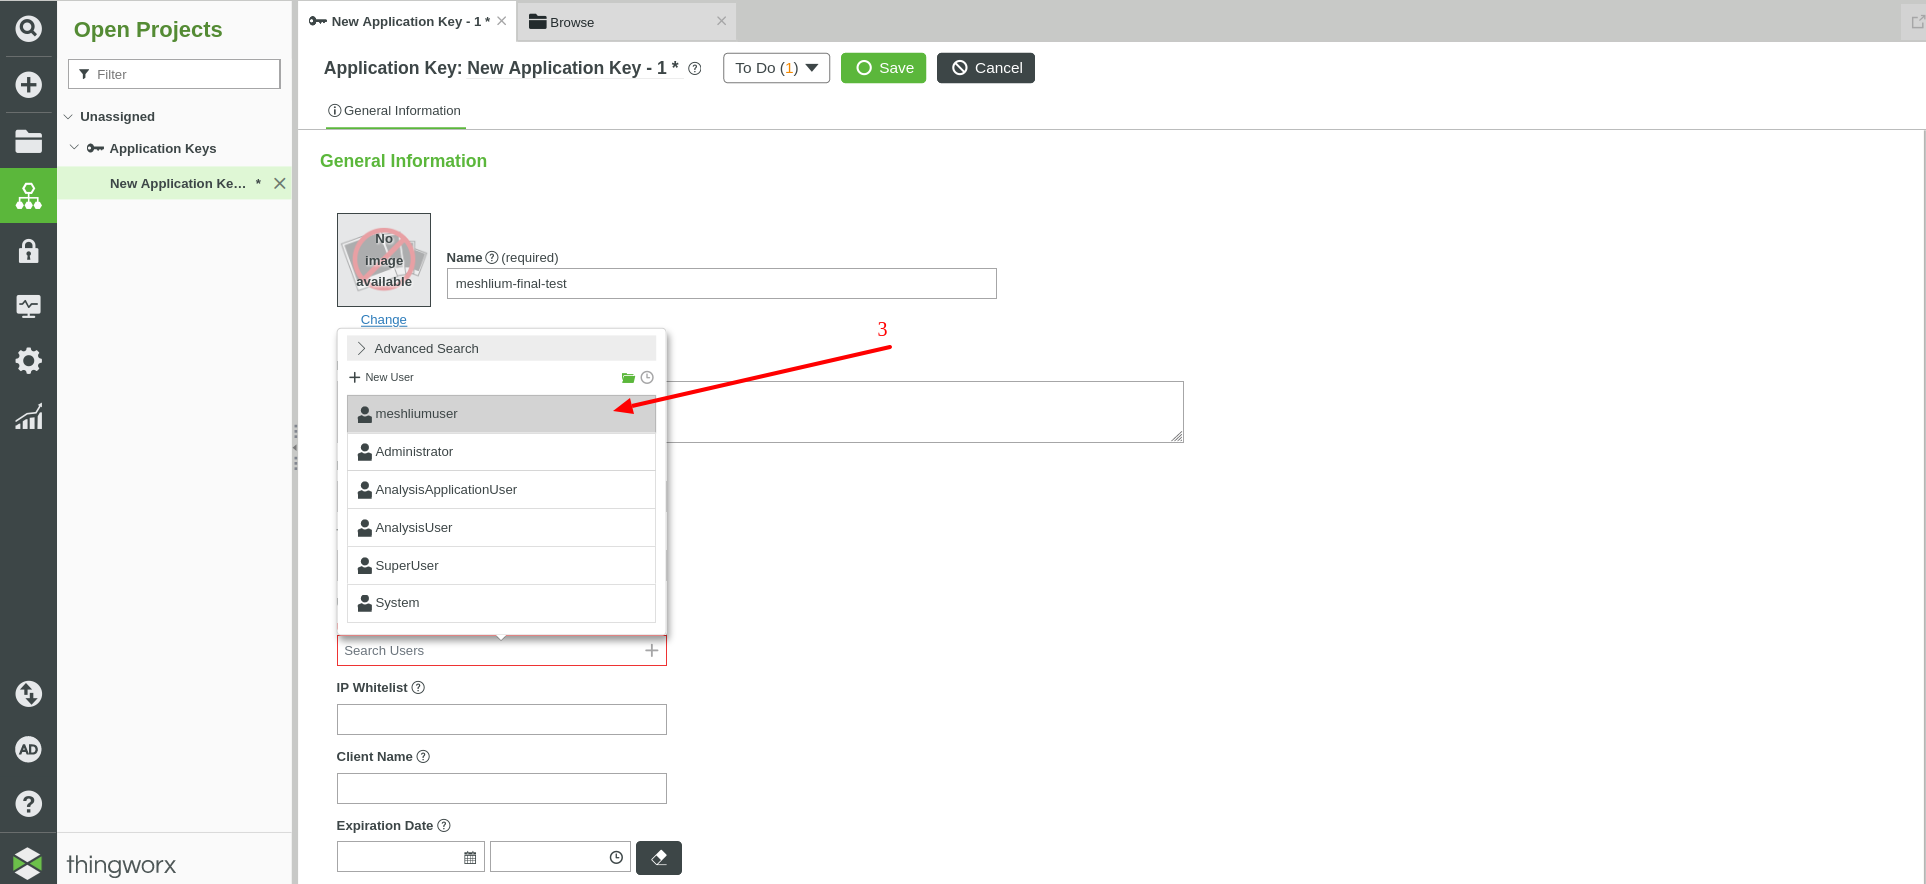
- Click the "+" button in the User Name Reference field
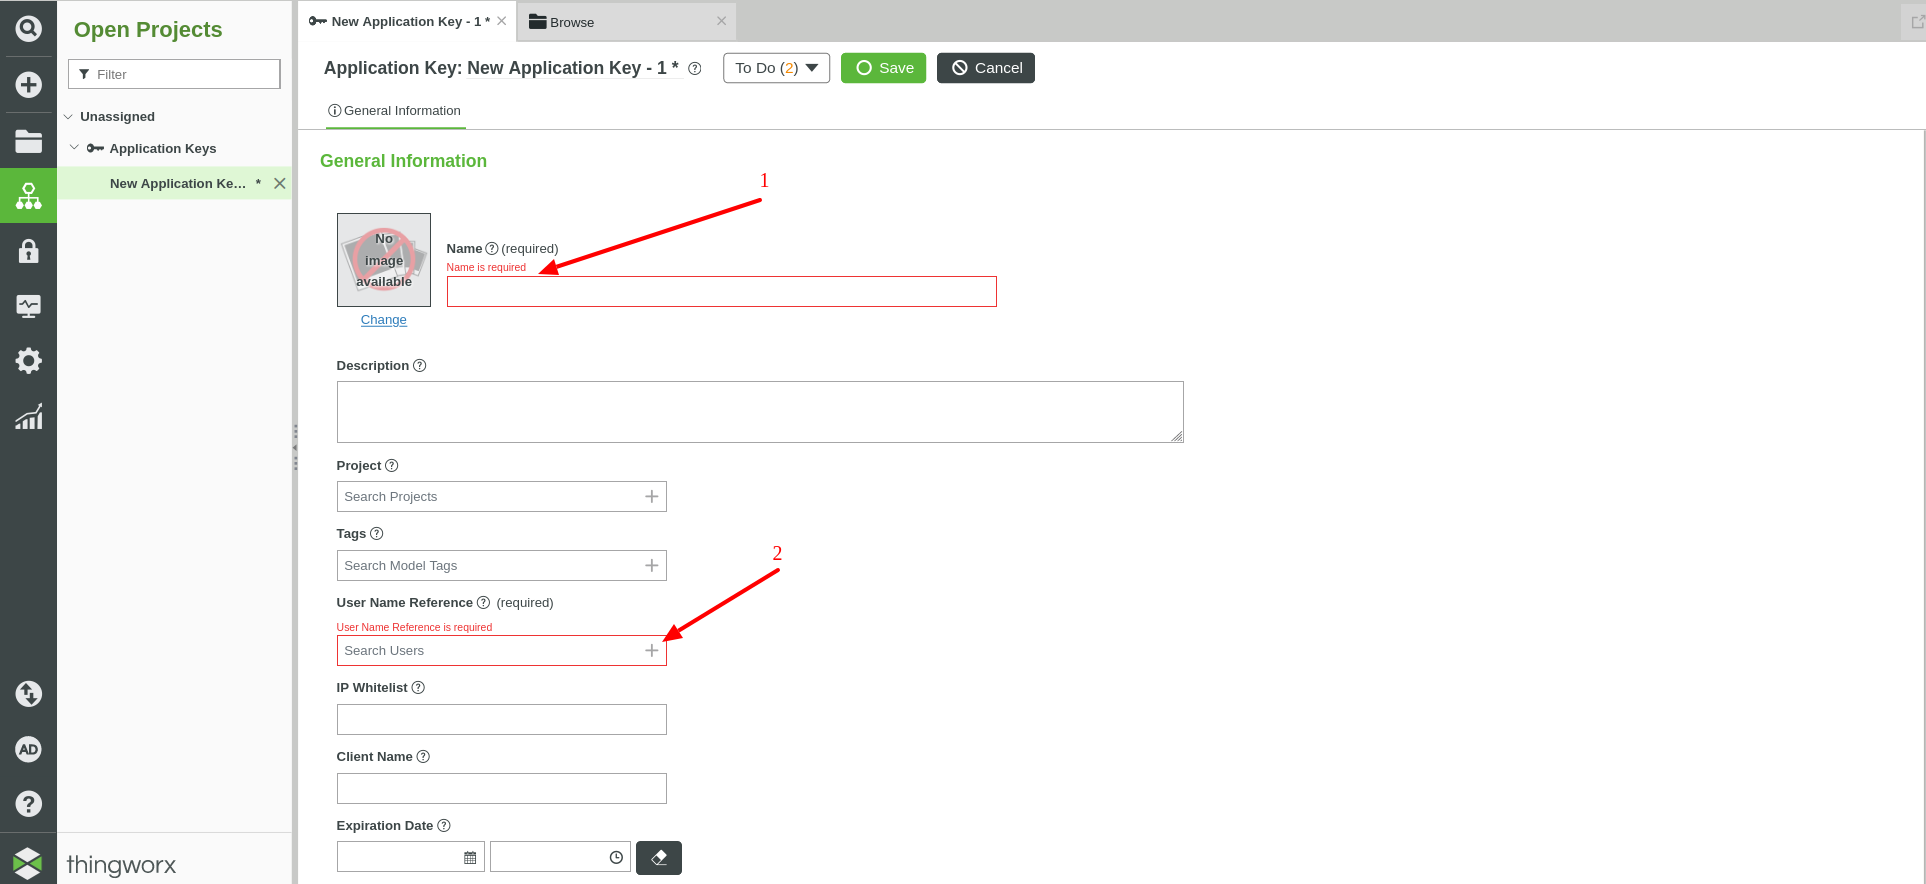
- Select an existing user name or create a new one
{warning.fa-dot} Visit ThingWorx support portal if you need more information about Users
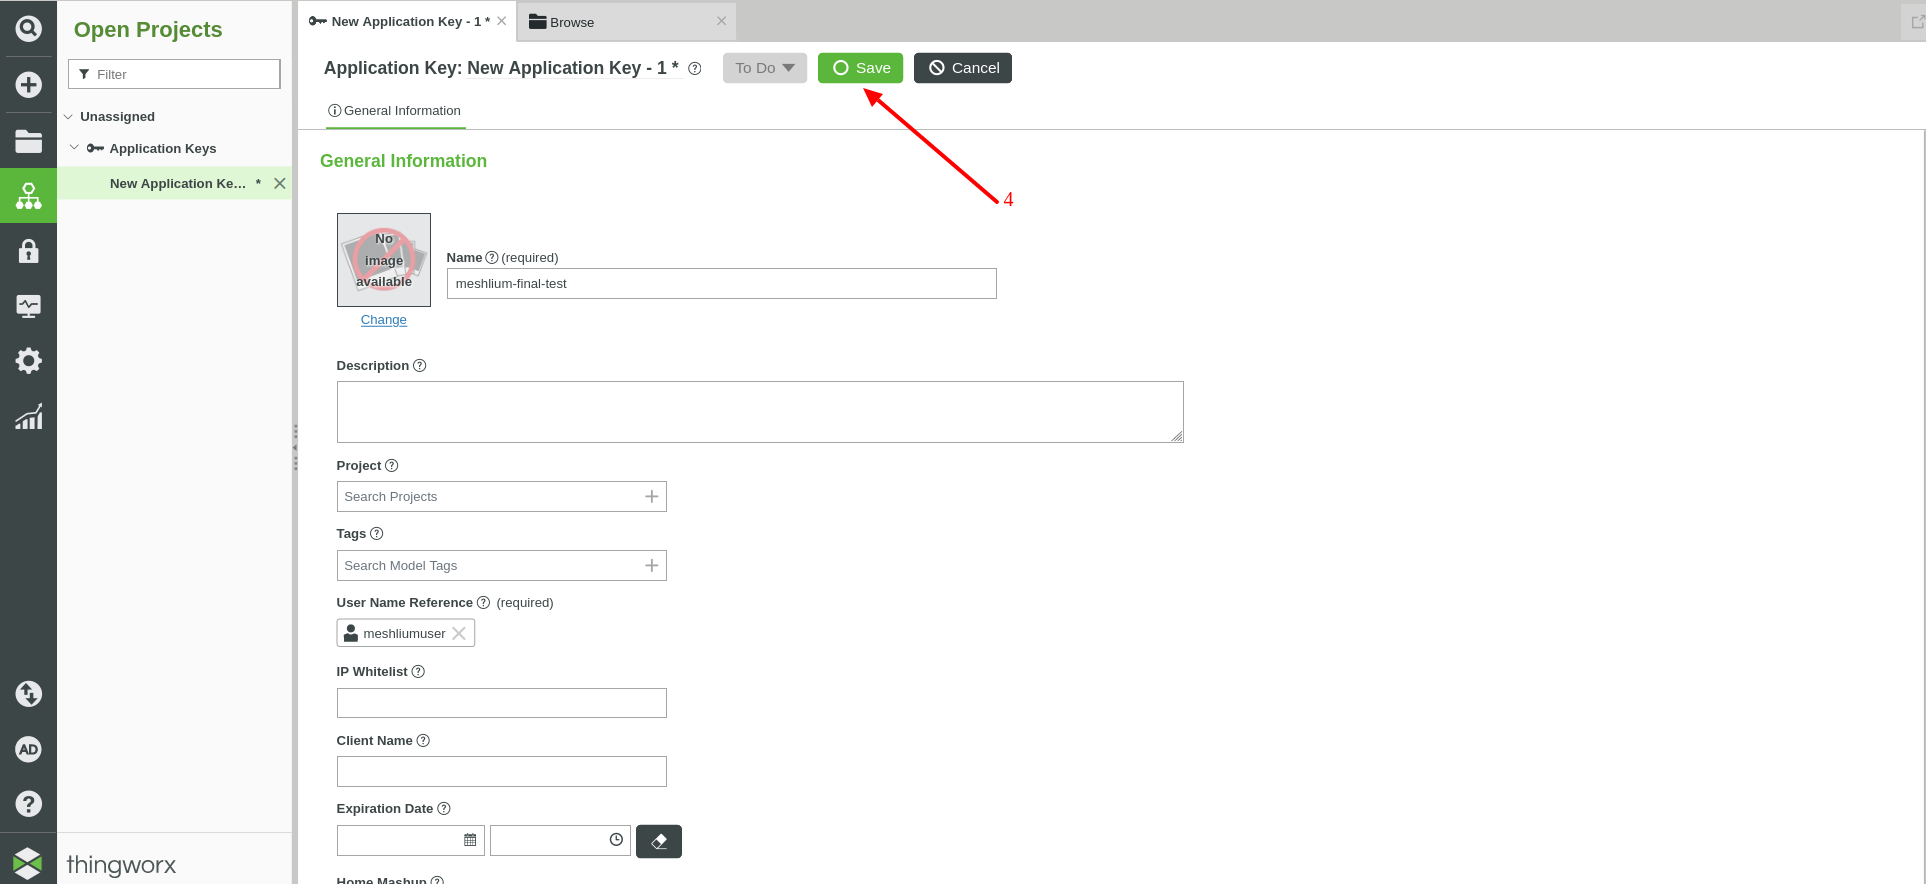
- Click the "Save" button
- Copy the Key ID value to configure Thinworx App Key field in the Meshlium's Manager System
Optional:
- Link to a tag in the Tags field
- Change the Expiration Date value
{warning.fa-dot} Visit ThingWorx support portal if you need more information about Application Keys
Set up the Meshlium gateway
Log-in your Meshlium Manager System.
In your browser:
- URL: <https://meshliumIP/ManagerSystem/>
- user: admin
- password: libelium
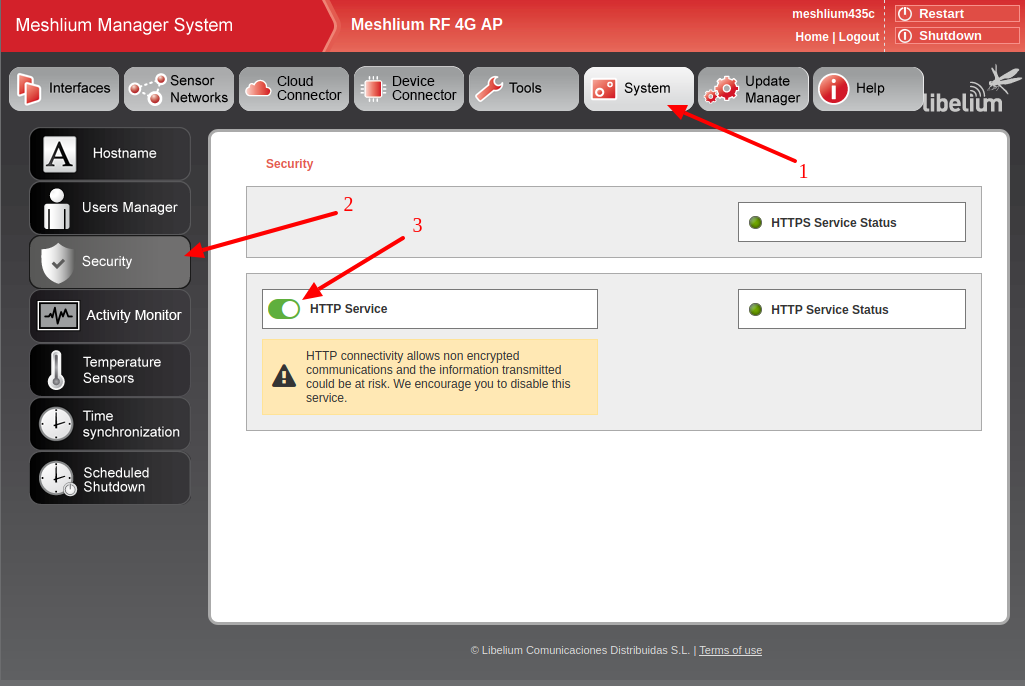
Activate the HTTP Service to enable the local communications of the EMS and LUA services using the loopback interface.
In the Manager System page, go to System > Security and activate the "HTTP Service" button.
Configure the ThingWorx cloud connector.
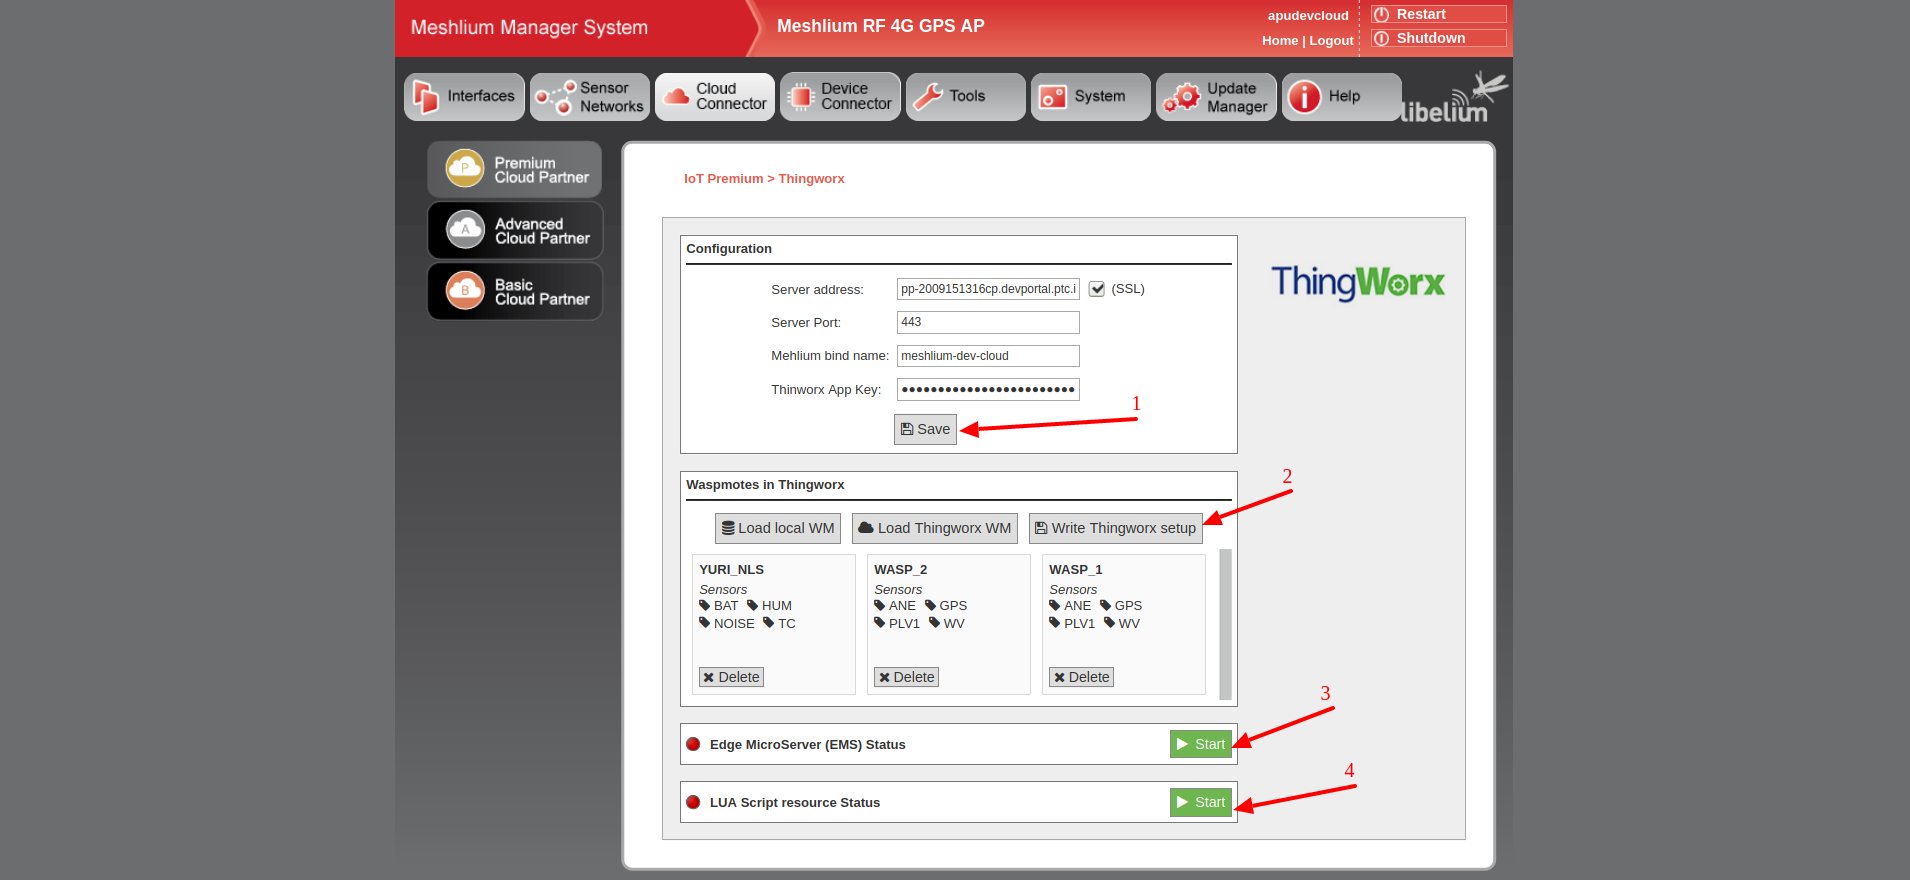
In the Manager System page, go to Cloud Connector > Premium Cloud Partner and click the ThingWorx icon.

Next, configure the Meshlium unit with the ThingWorx Application Key.
In the Configuration section:
- Server address: The address of your ThingWorx server
- Server Port: The port where your ThingWorx server is accessible
- Meshlium bind name: The name of the Meshlium “thing” in ThingWorx (Meshlium is detected in ThingWorx as a gateway)
- ThingWorx App Key: Security key to send data to your ThingWorx server (see previous section for generating the App Key)
- Click the "Save" button
- Click the "Start" button in the Edge MicroServer (EMS) Status section
Check the EMS connection
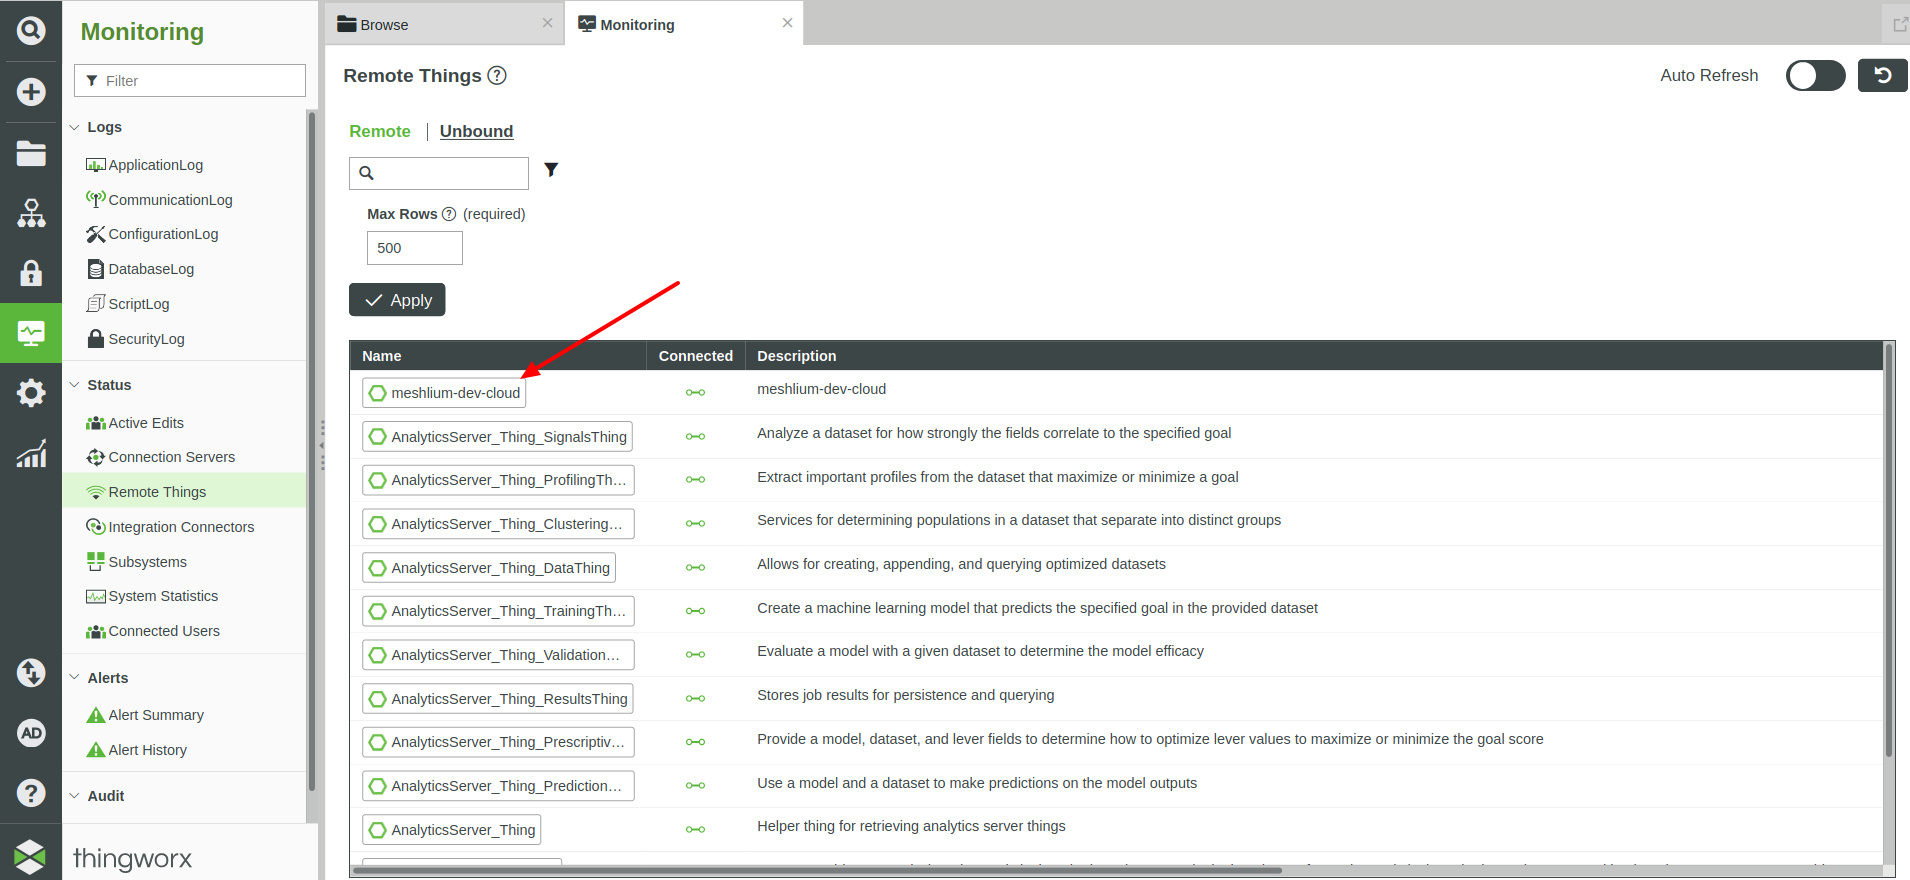
We will check now that the Meshlium gateway is connected to the ThingWorx platform.
In the home page of your ThingWorx Composer, go to Monitoring > Remote Things. The name configured in the parameter Meshlium bind name should be displayed.
Set up the Meshlium Remote Things
Configure the Waspmotes or Plug & Sense! units that will send information to the ThingWorx platform.
In the Waspmotes in ThingWorx section:
- Click on the button "Load local WM". This will read Waspmotes that have data in the sensor database. A panel with the devices is displayed, with a list of the sensors received from each Waspmote.
- Click on the button "Delete" to delete a Waspmote from the list. This device won't be published to the ThingWorx platform.
- Click on the button "Write ThingWorx setup" to push this setup to the ThingWorx EMS service.
- Click on the button "Start" in the section LUA Script resource Status.

Check the LUA connection
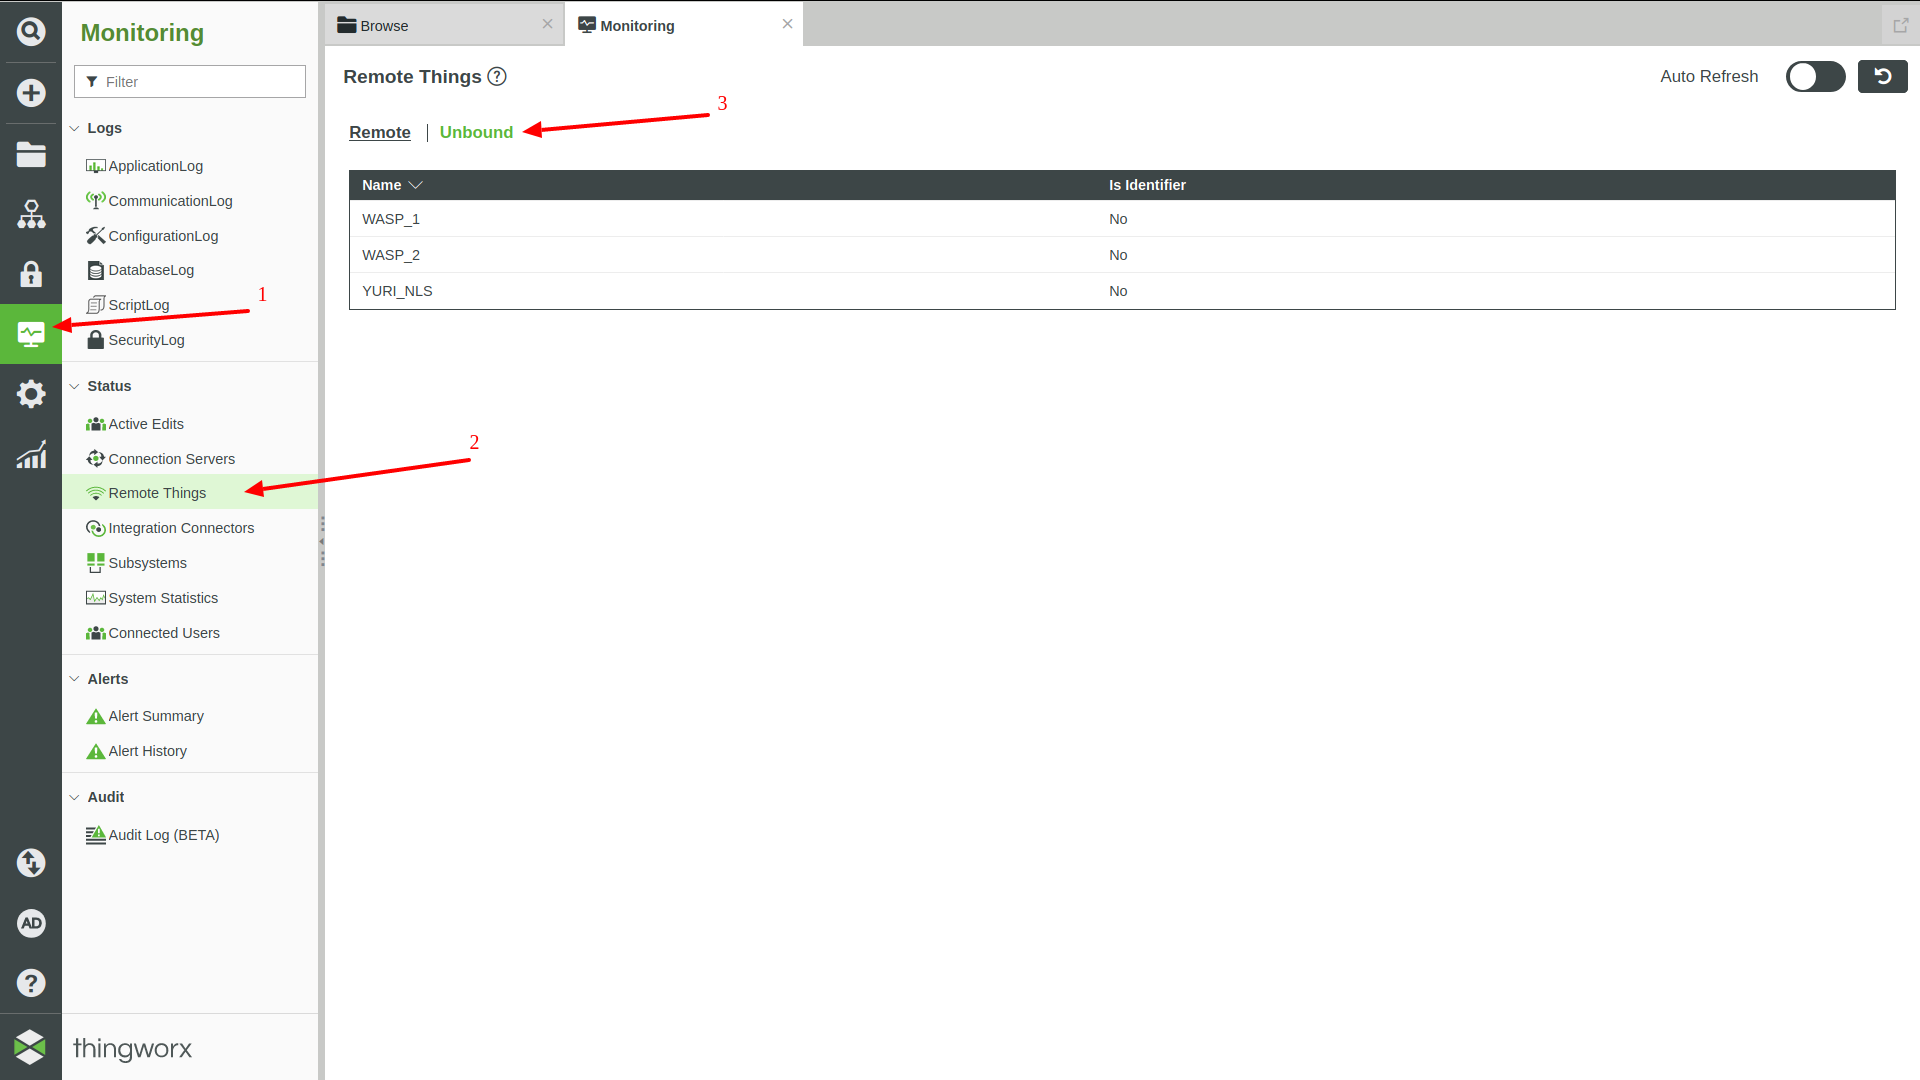
We will check that the Unbound Remote Things are the configured Waspmote or Plug & Sense! units.
In the home page of your Thinworx Composer, go to Monitoring > Remote Things, and click on the button "Unbound". Check that the Waspmote or Plug & Sense! devices configured previously to send data are shown.
Publish Remote Things
Publish Remote Things (Waspmote and Plug & Sense!)
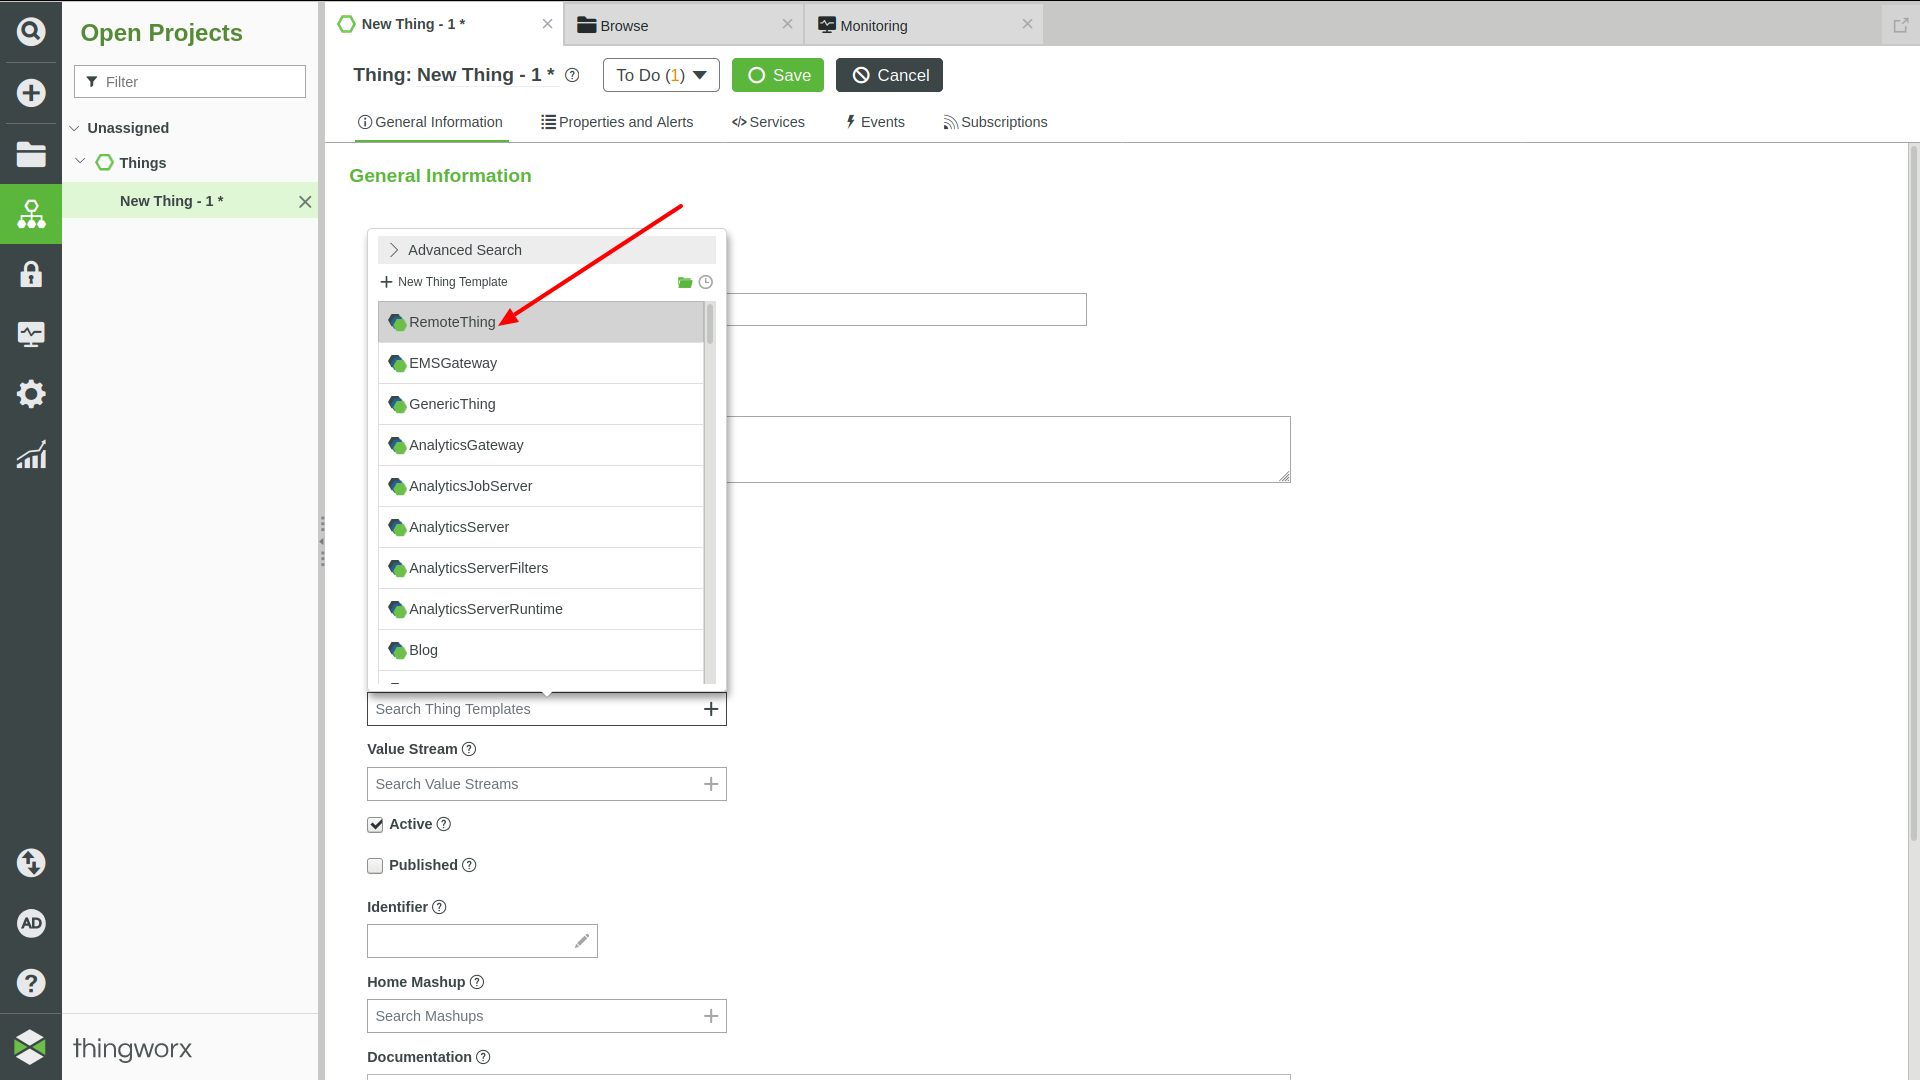
We will create a new thing in the ThingWorx Foundation backend. If we create new things this manner, they will be automatically associated to the Waspmote things published by Meshlium gateway using EMS. Furthermore, the “RemoteThing” template must be set to this new thing.
In the home page of your ThingWorx Composer, go to Browse > Things, and click on the button "+New".
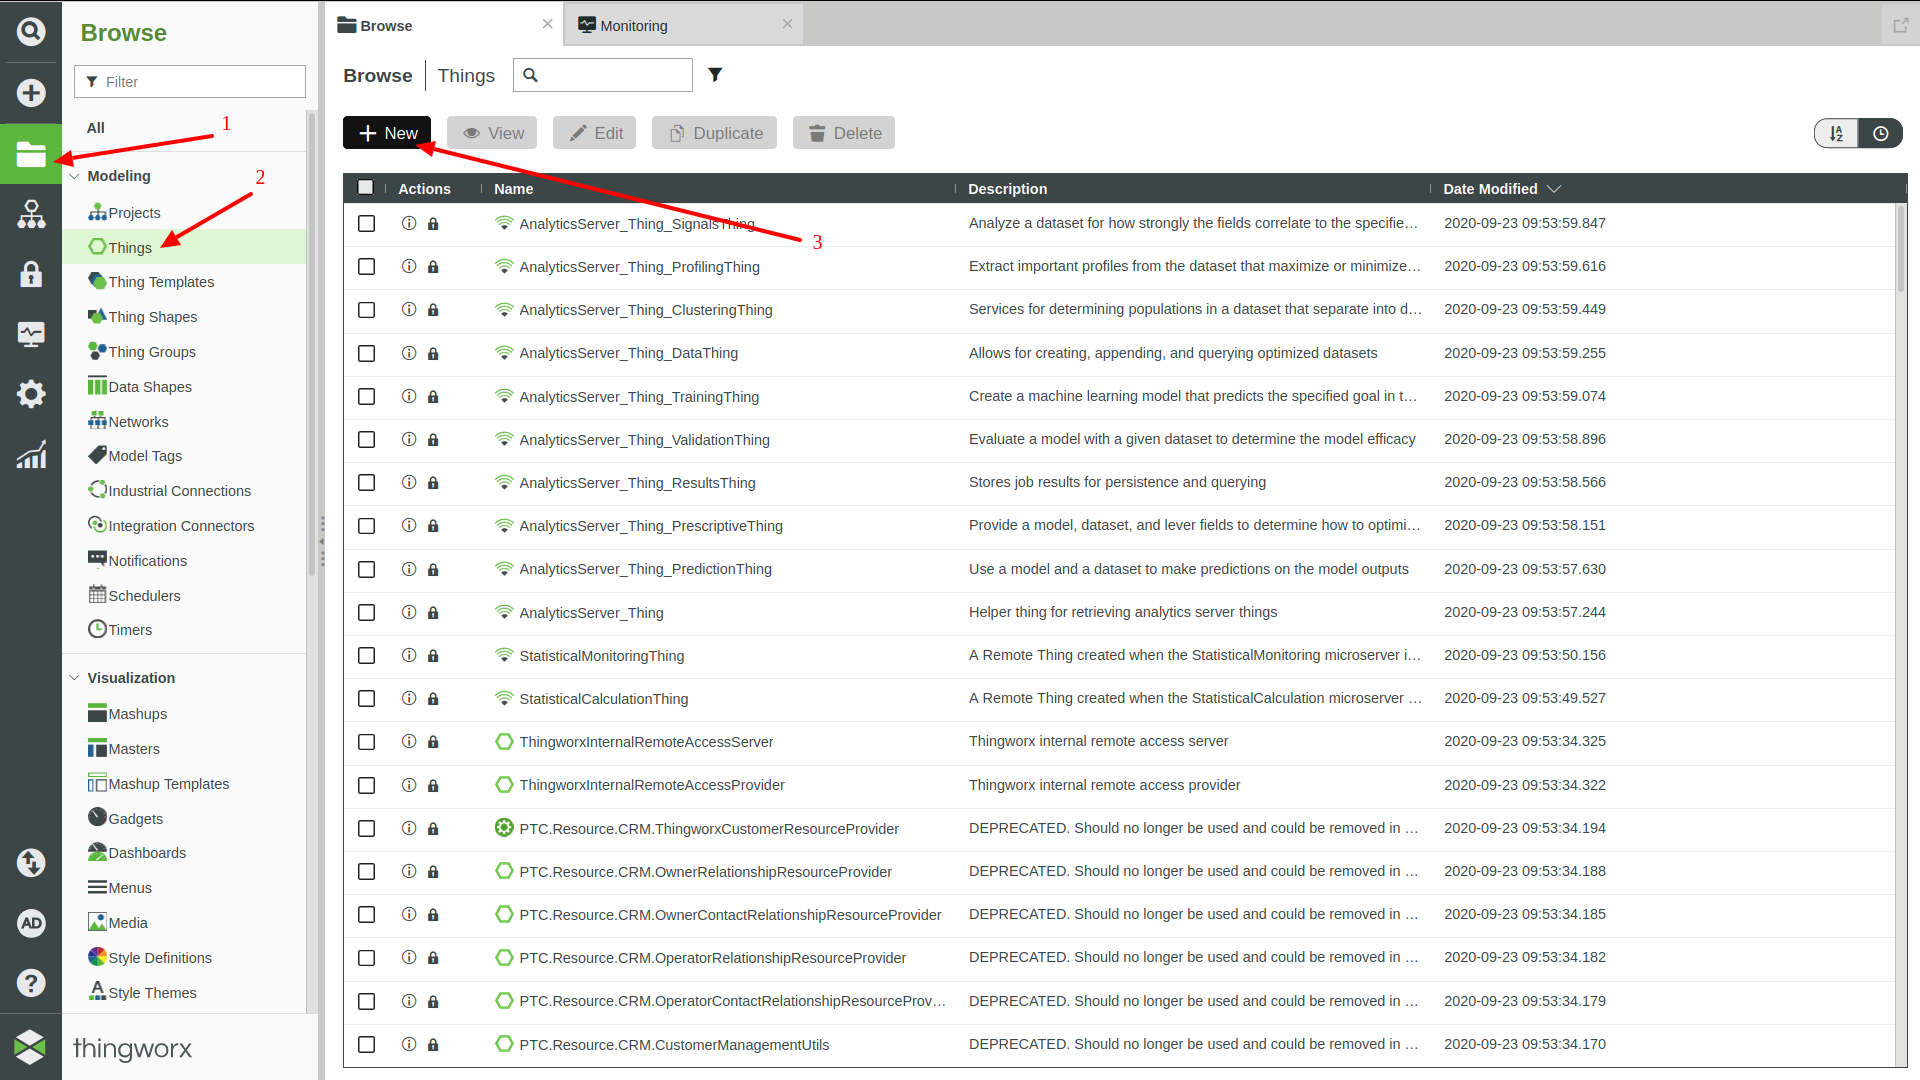
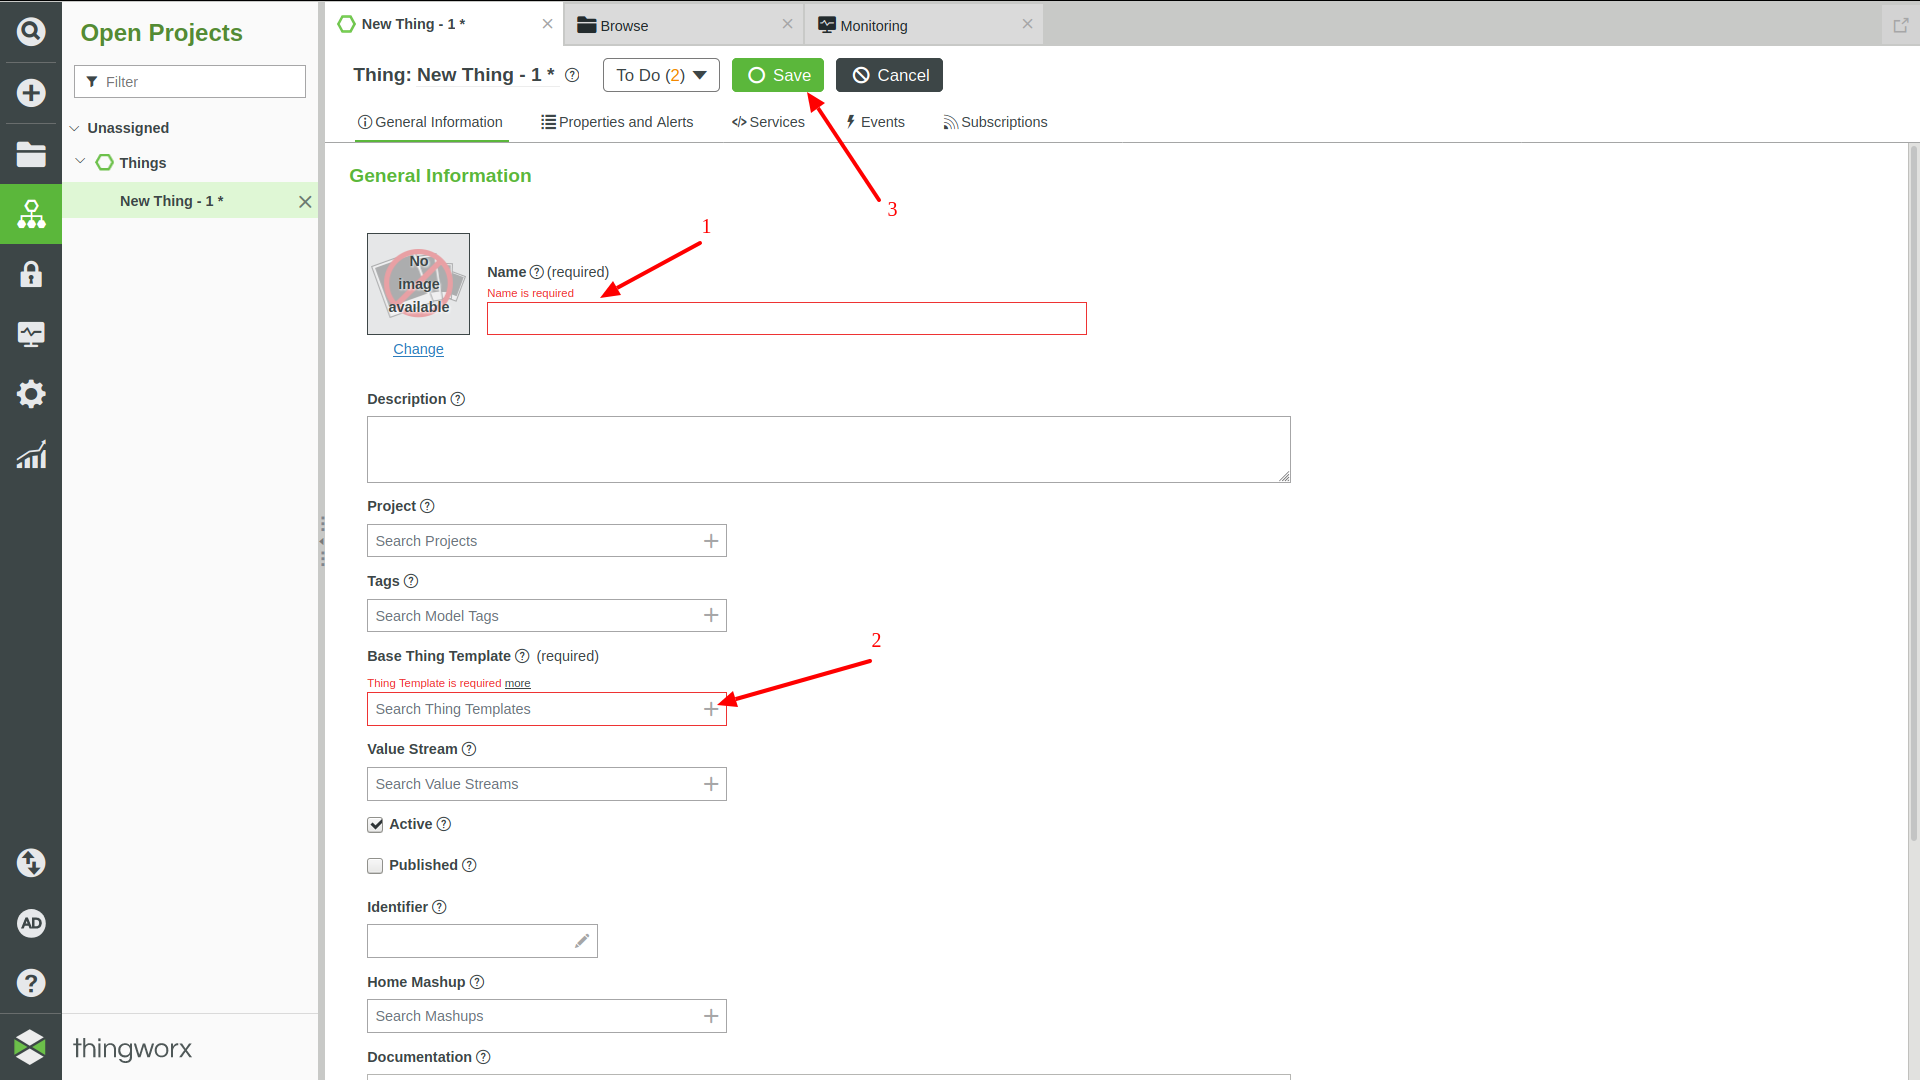
- Type a Name for the Thing, it must be exactly the same value than the text string shown in the Name column of the Unbound list.
- Click the "+" icon in the Base Thing Template field
- Select the RemoteThing template
{warning.fa-dot} Visit ThingWorx support portal if you need more information about Things
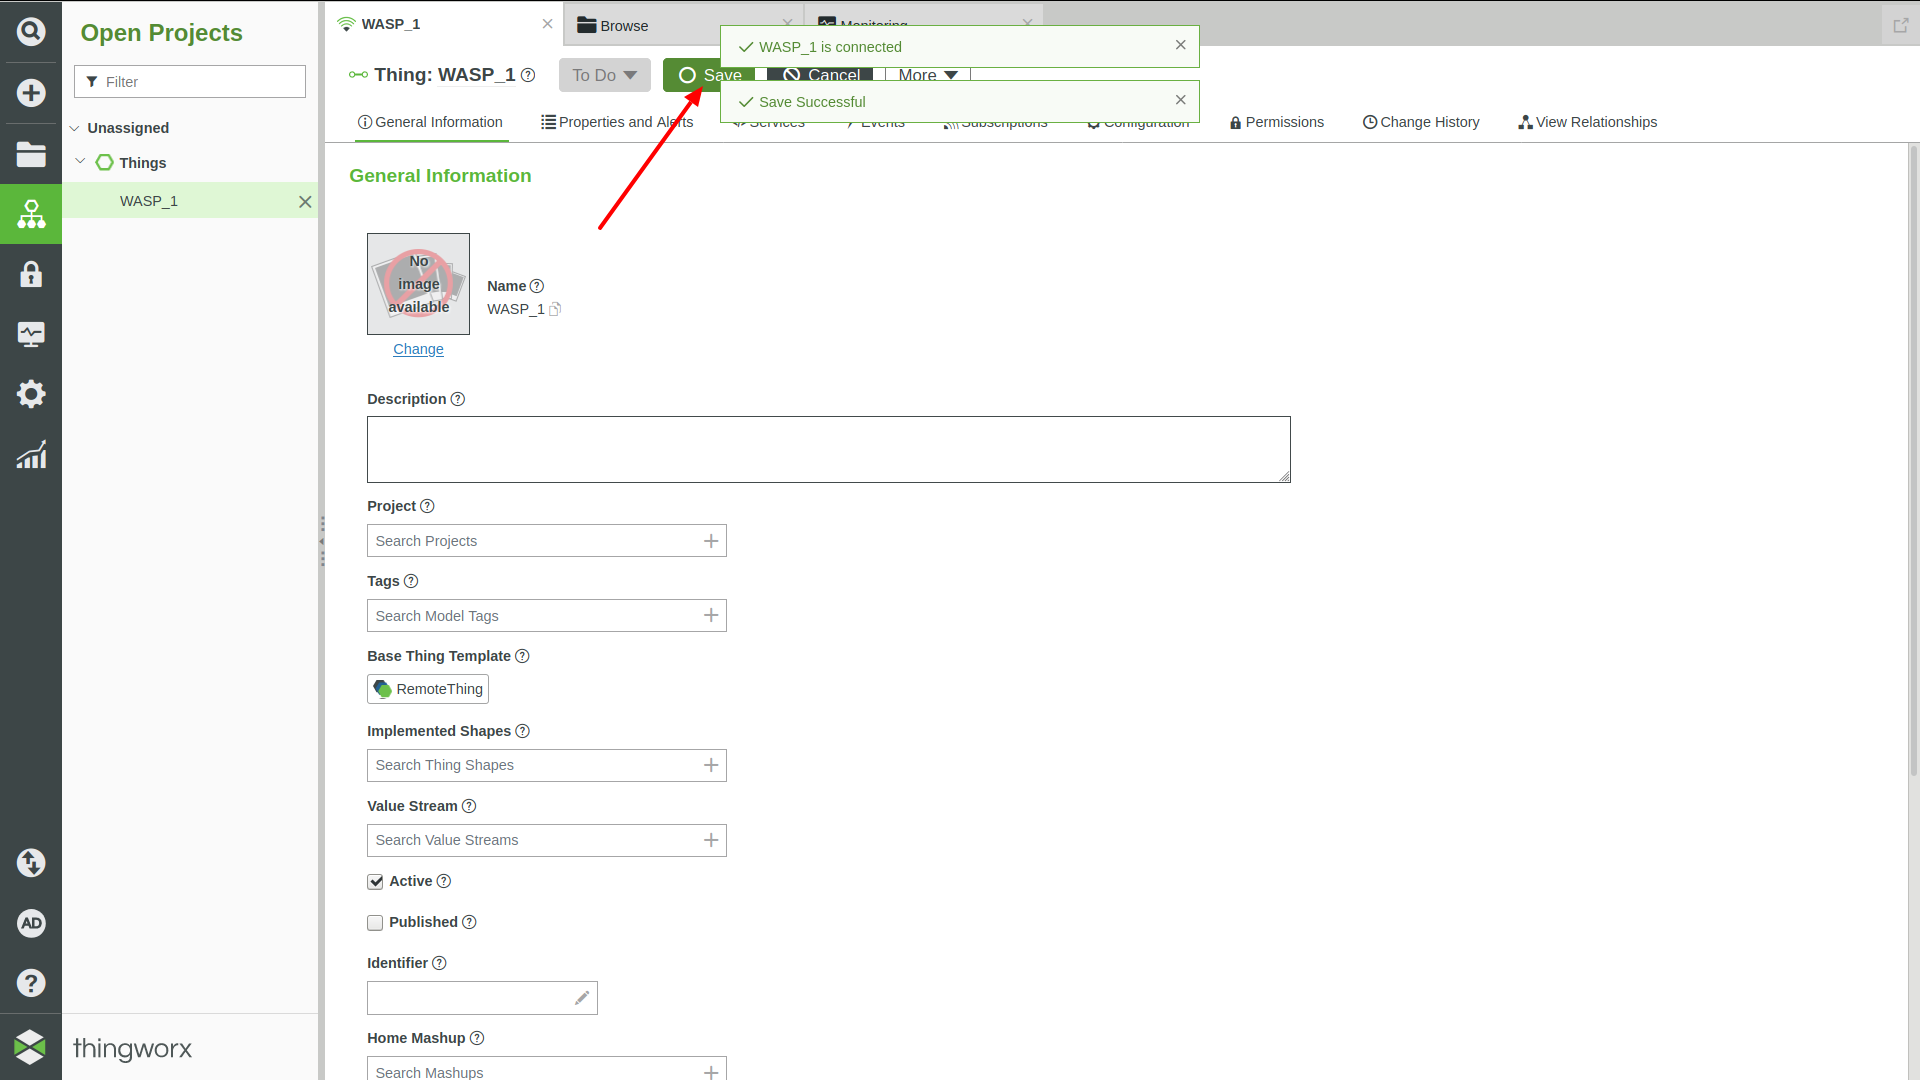
- Click the button "Save"
Publish Sensor Values (Waspmote and Plug & Sense!)
After the Waspmote or Plug & Sense! Remote Thing has been successfully created, it's time to bind the Sensor values to this Waspmote or Plug & Sense!. We will edit the Waspmote Remote Thing properties.
In the new Thing created:
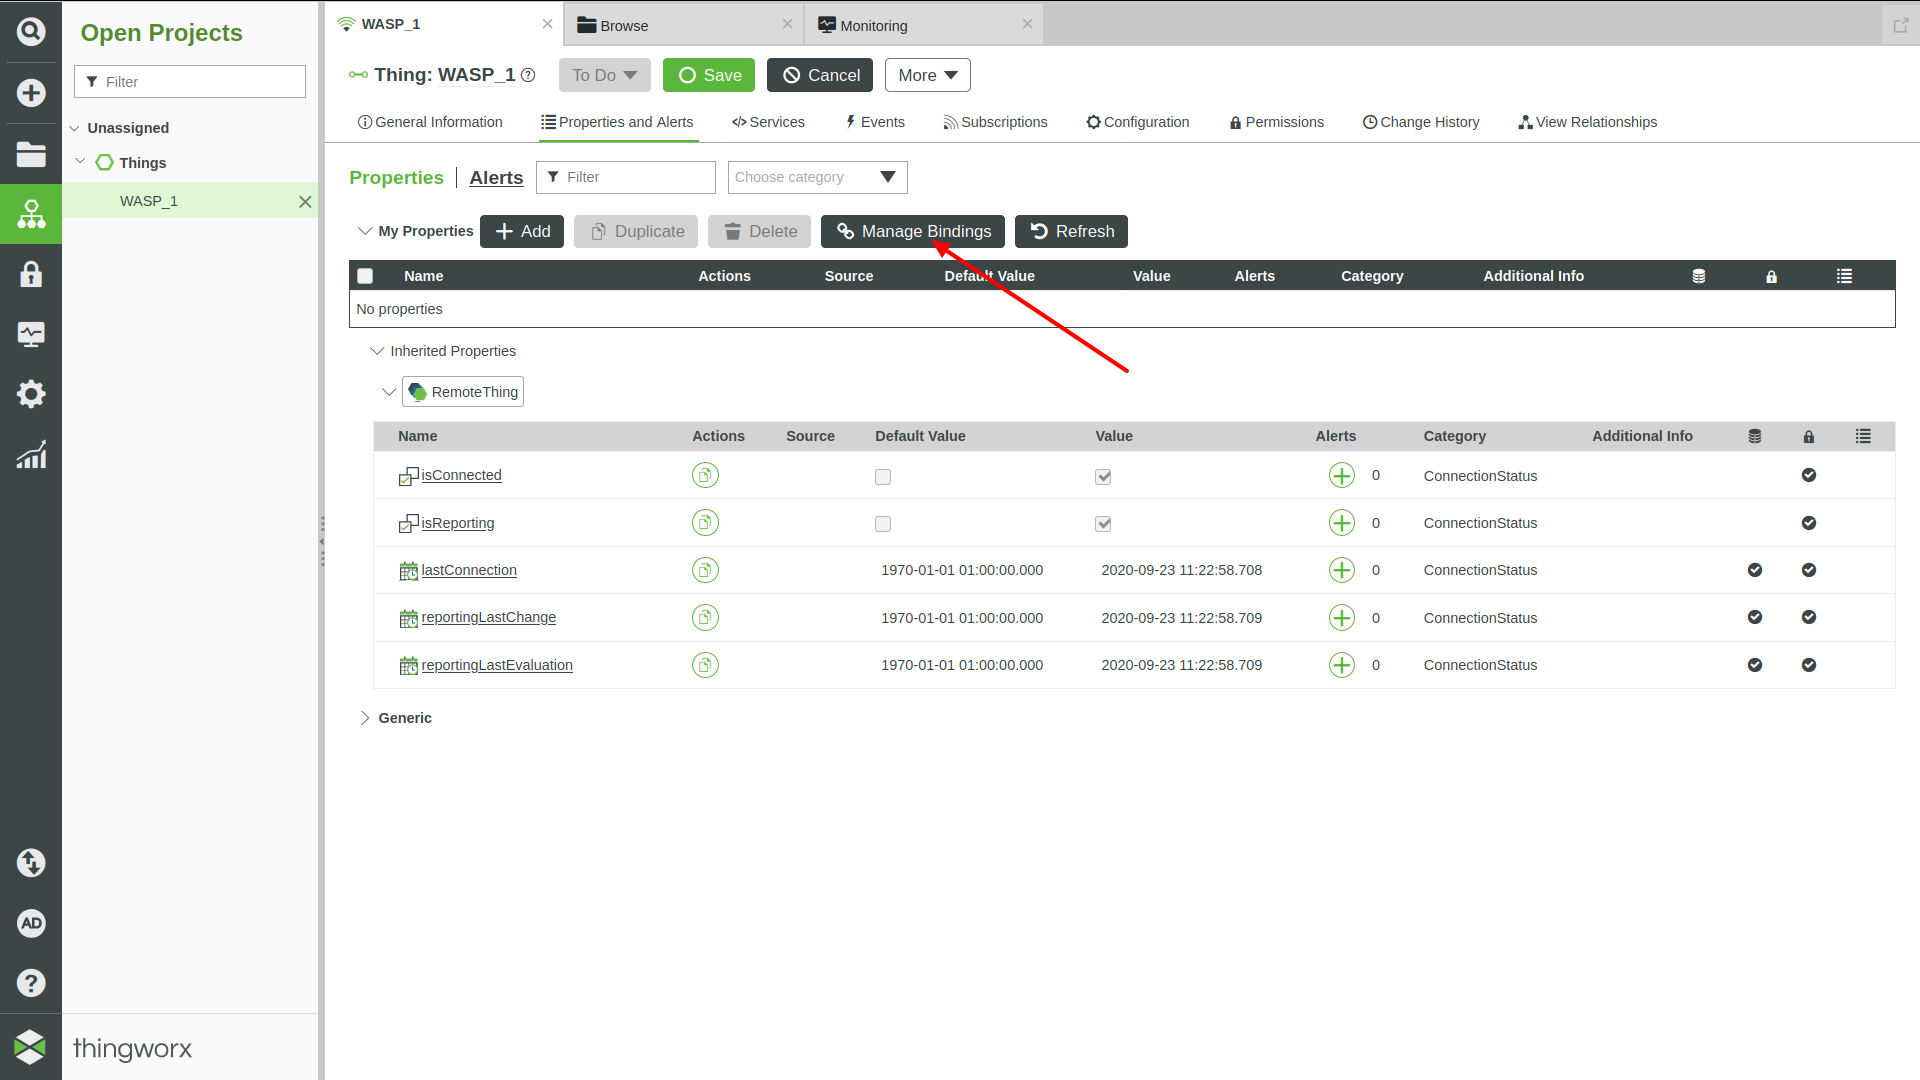
- Click the button "Manage Bindings"
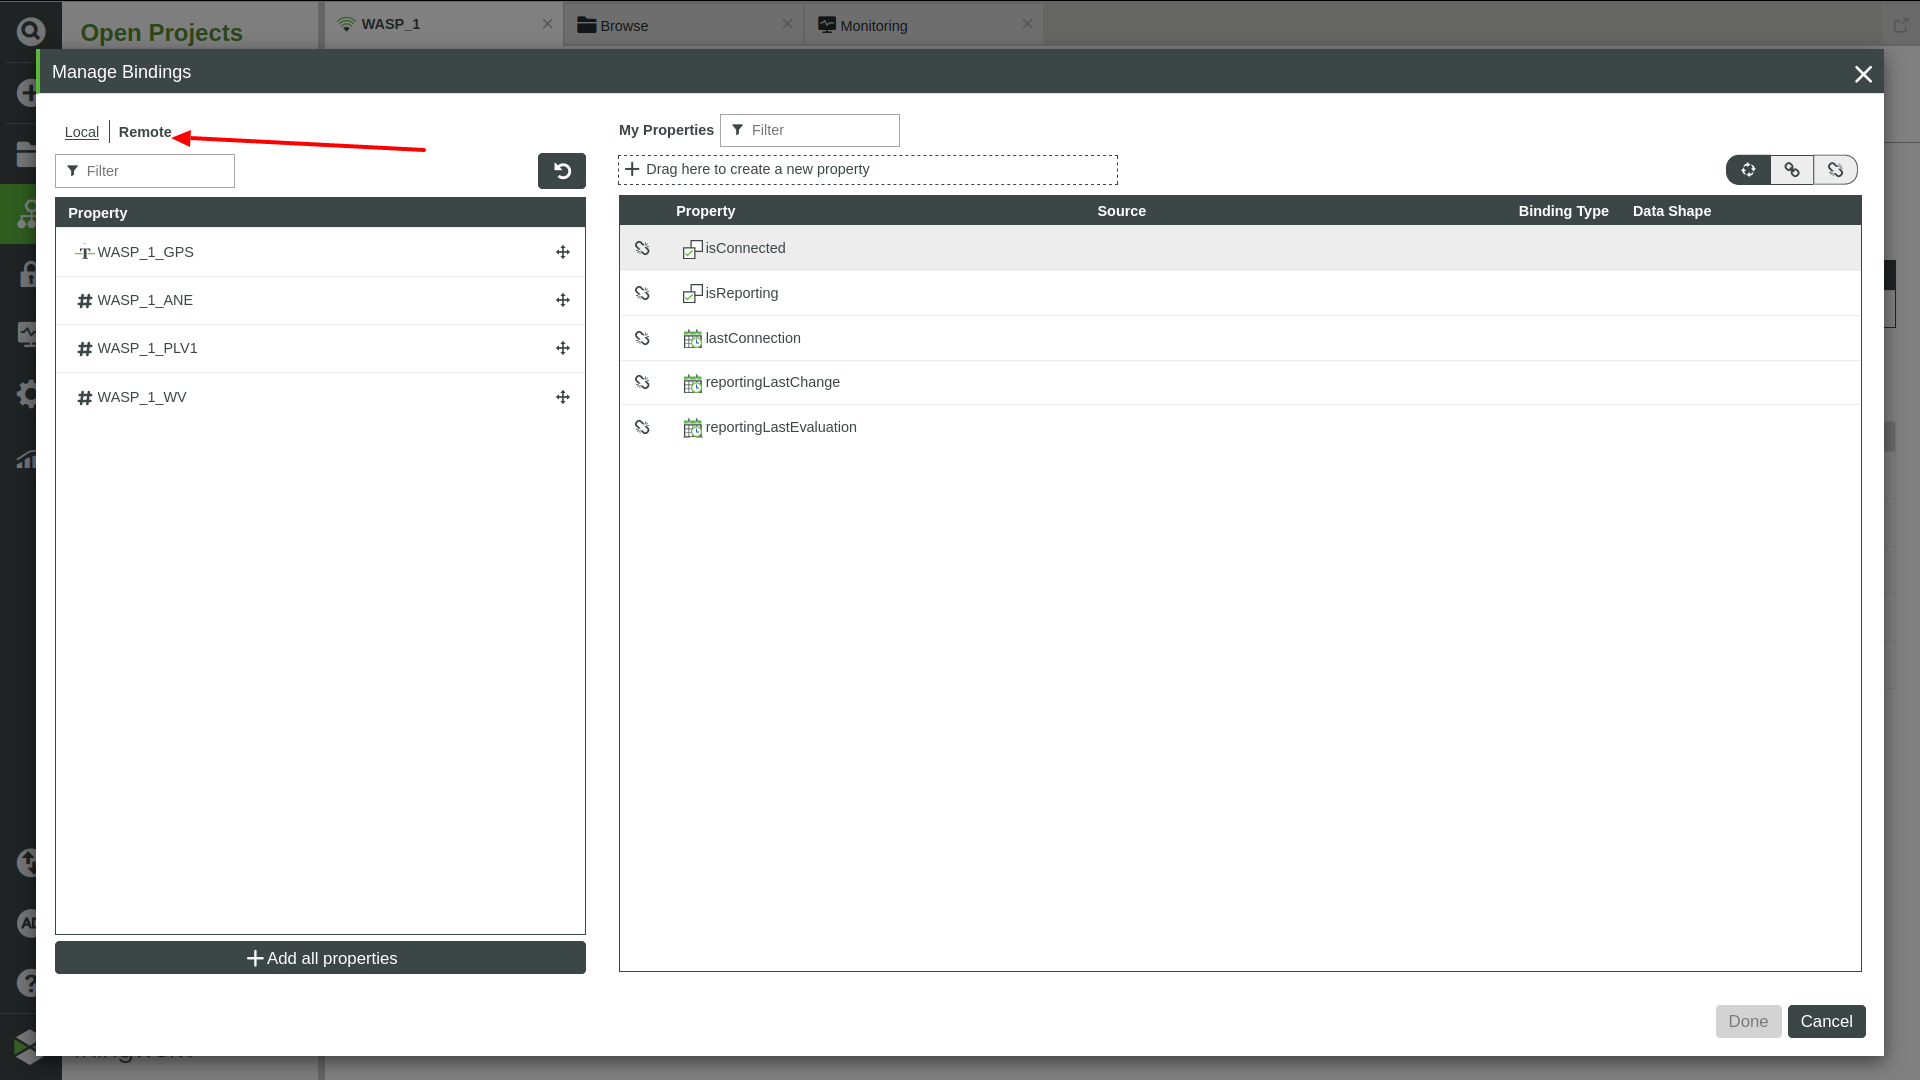
- Click on the button "Remote" to show the Sensors available in this Waspmote Remote Thing.
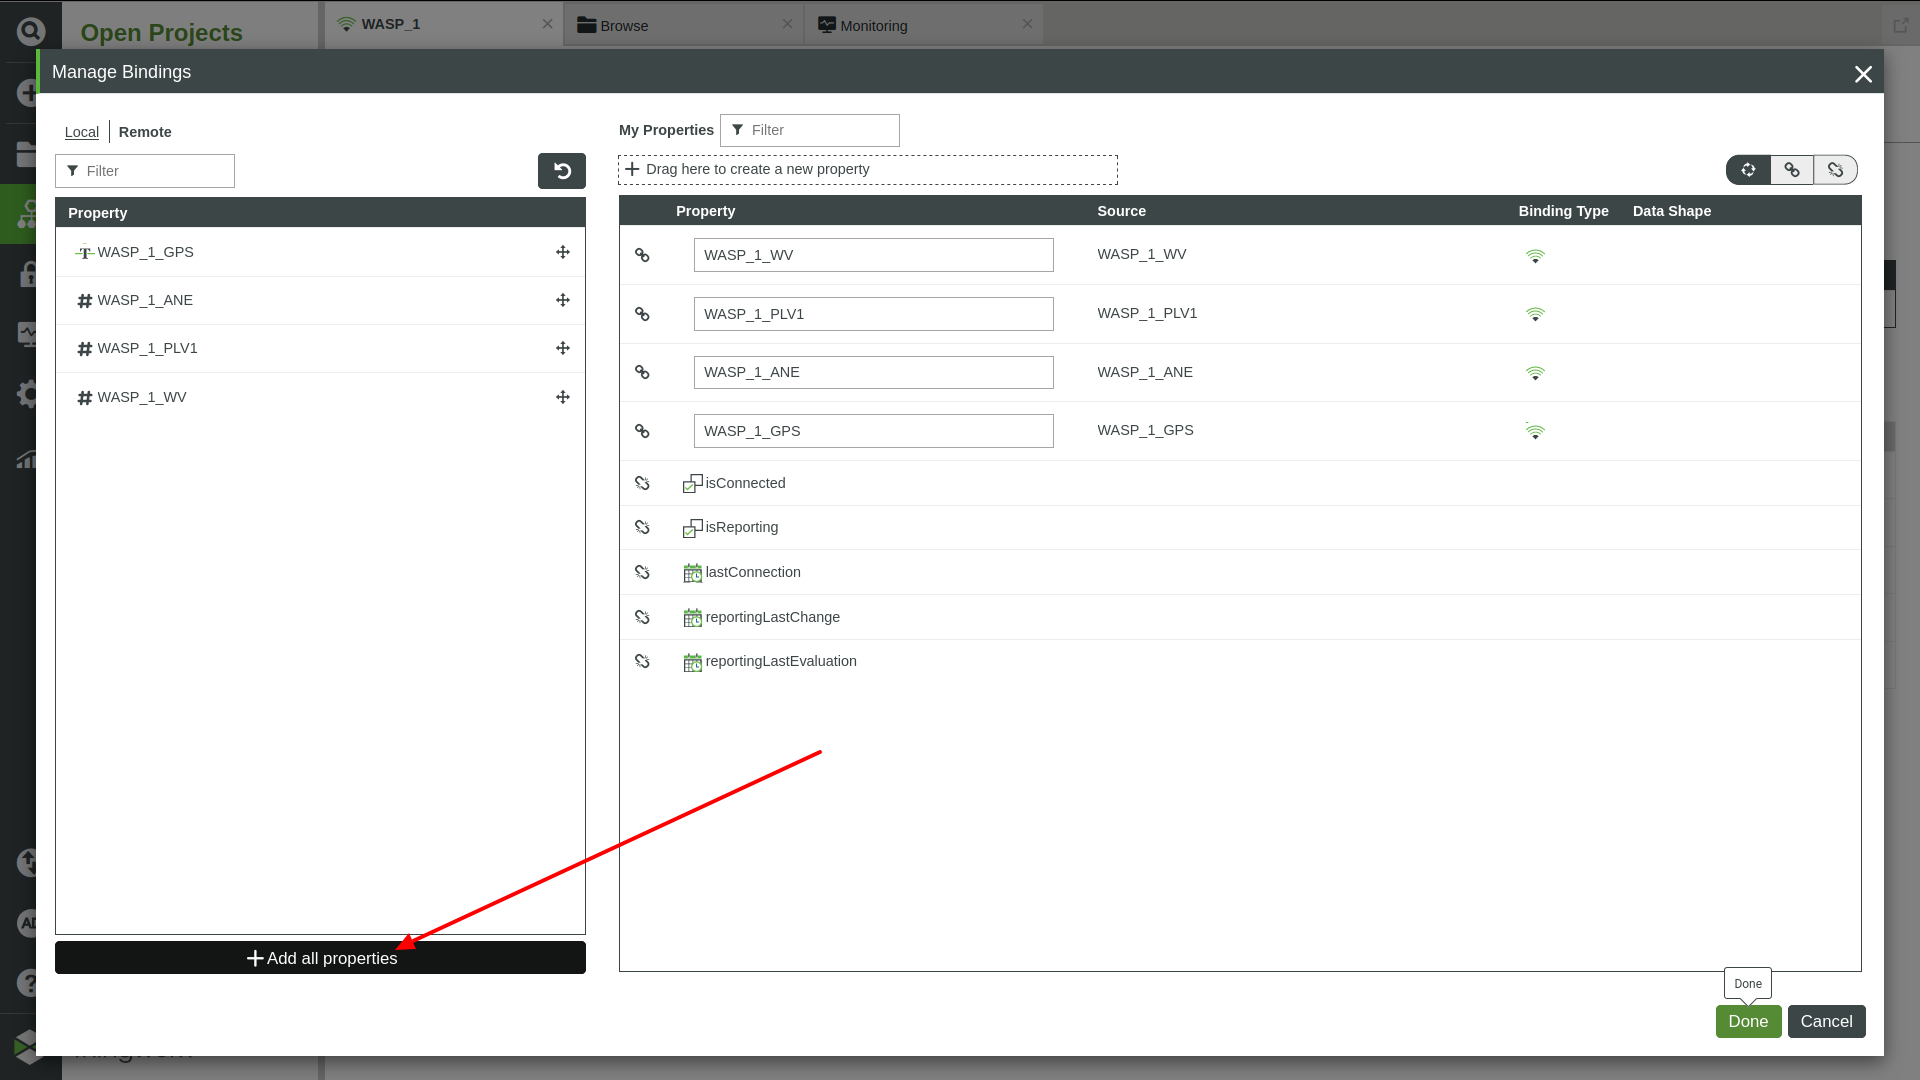
- Click on the button "Add all properties" or drag & drop the properties that you want to add.
- Click the button "Save" and the new properties they will be loaded in the Properties table of the Remote Thing being edited.
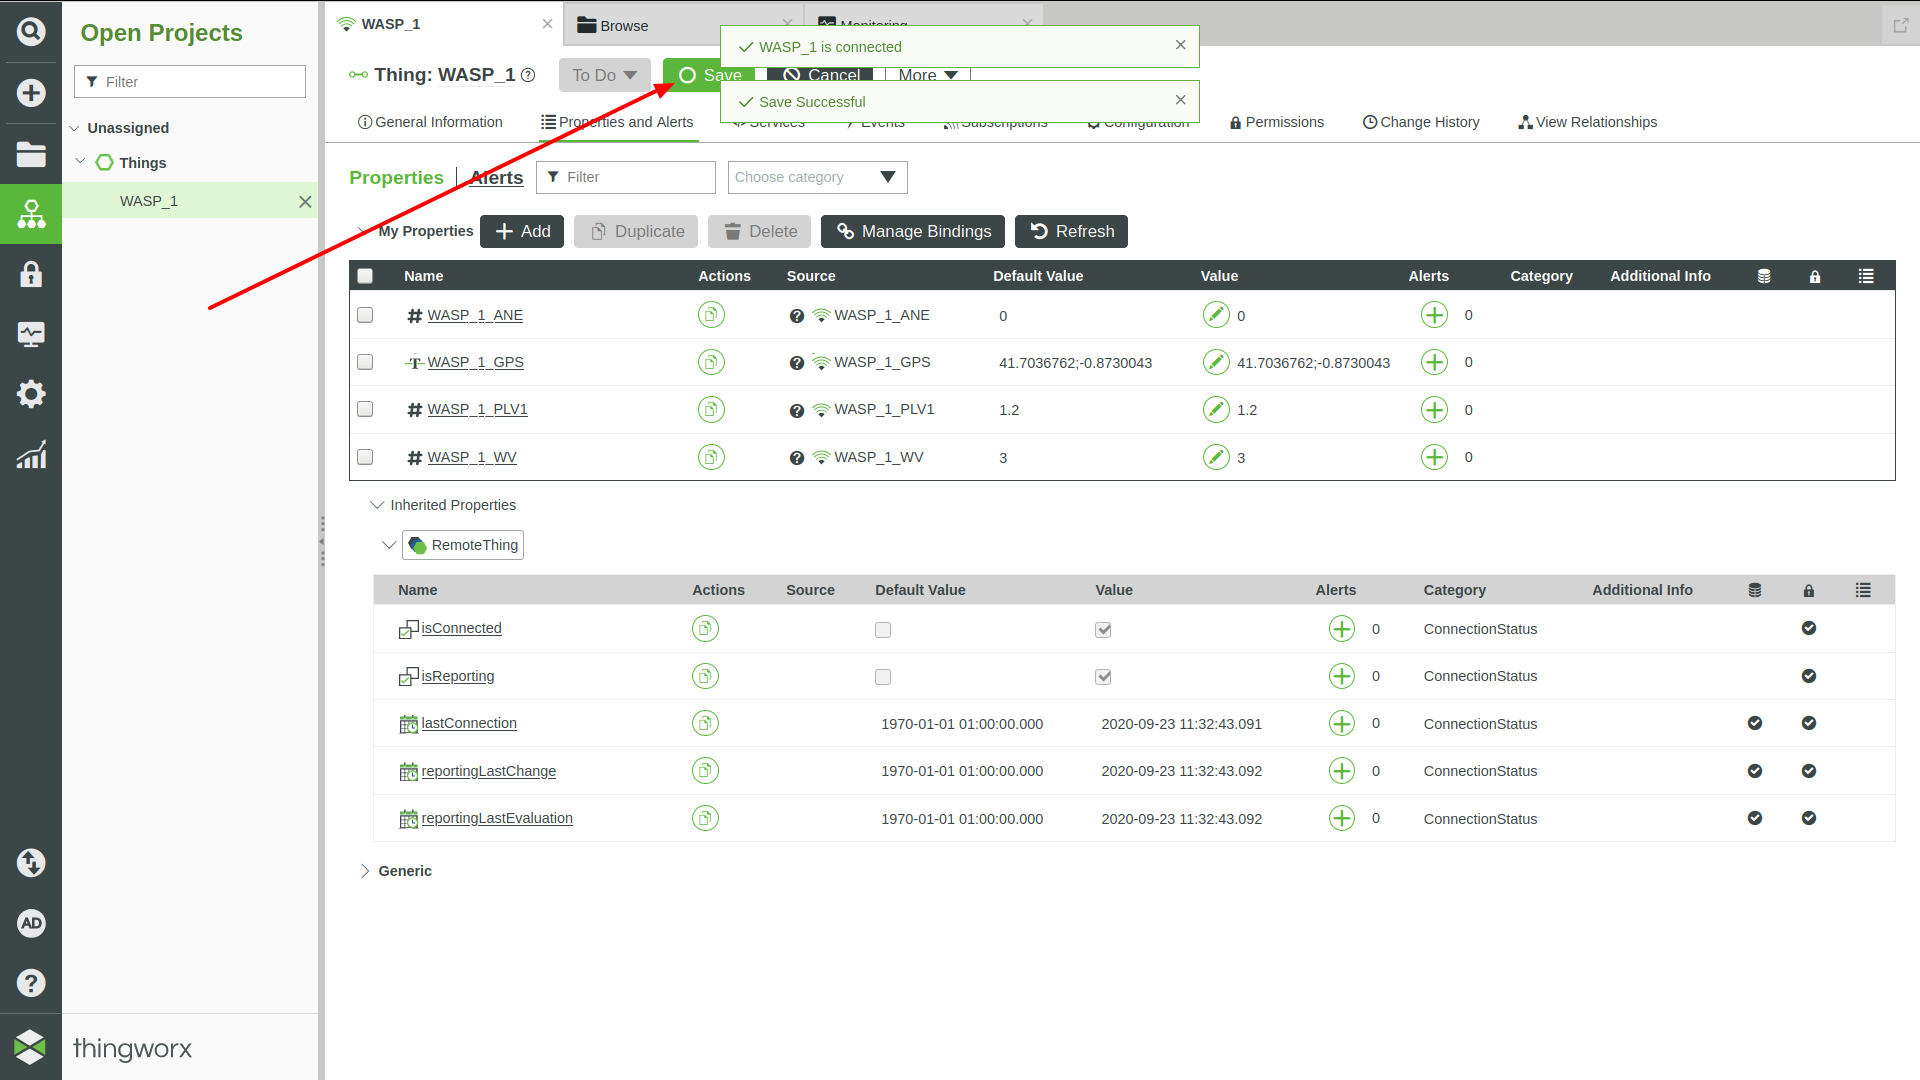
Configure Remote Things parameter values
To get the sensor values updated we need to configure the new properties.
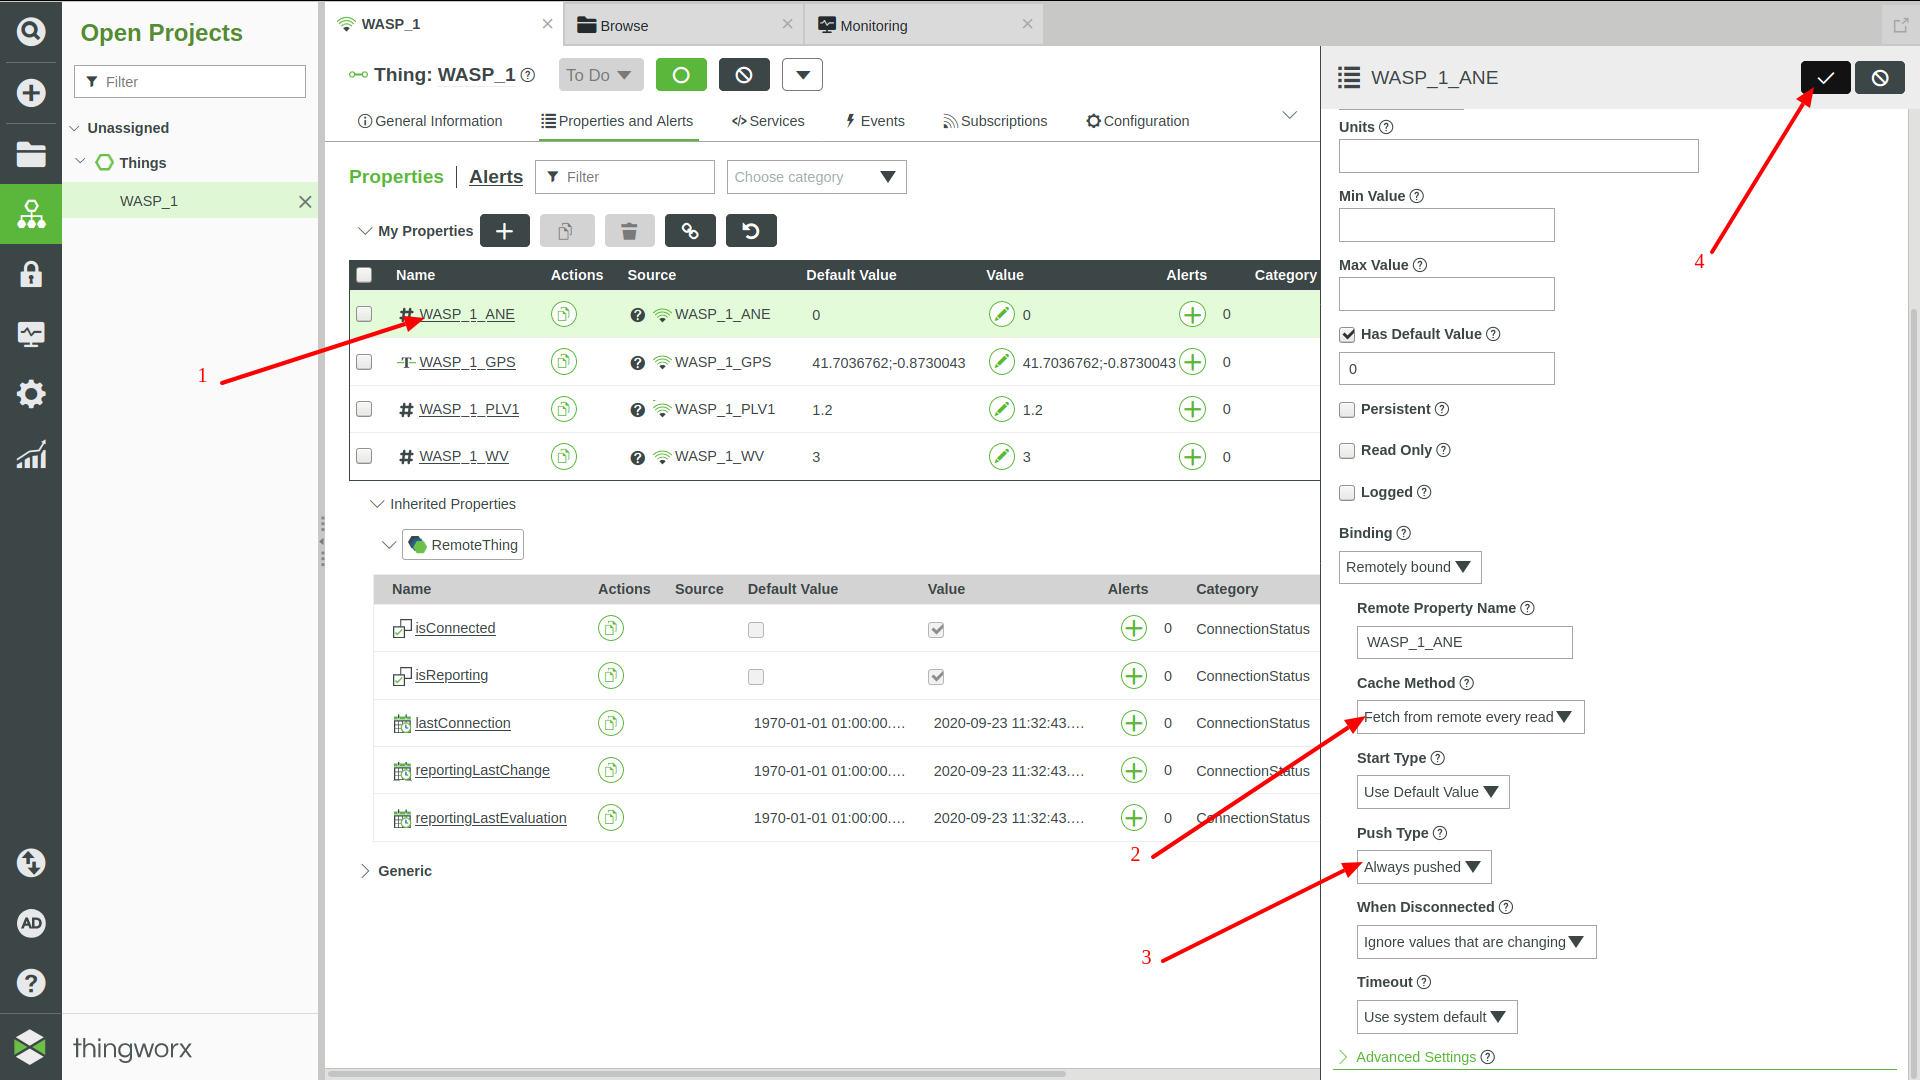
In the new Thing Properties created:
- Click on the name of the property
- Click on the Cache Method dropdown menu and set it to "Fetch from remote every read"
- Click on the Push Type dropdown menu and set to "Always pushed"
- Click the button "Done" (tick); each sensor's values are shown on the Properties table.
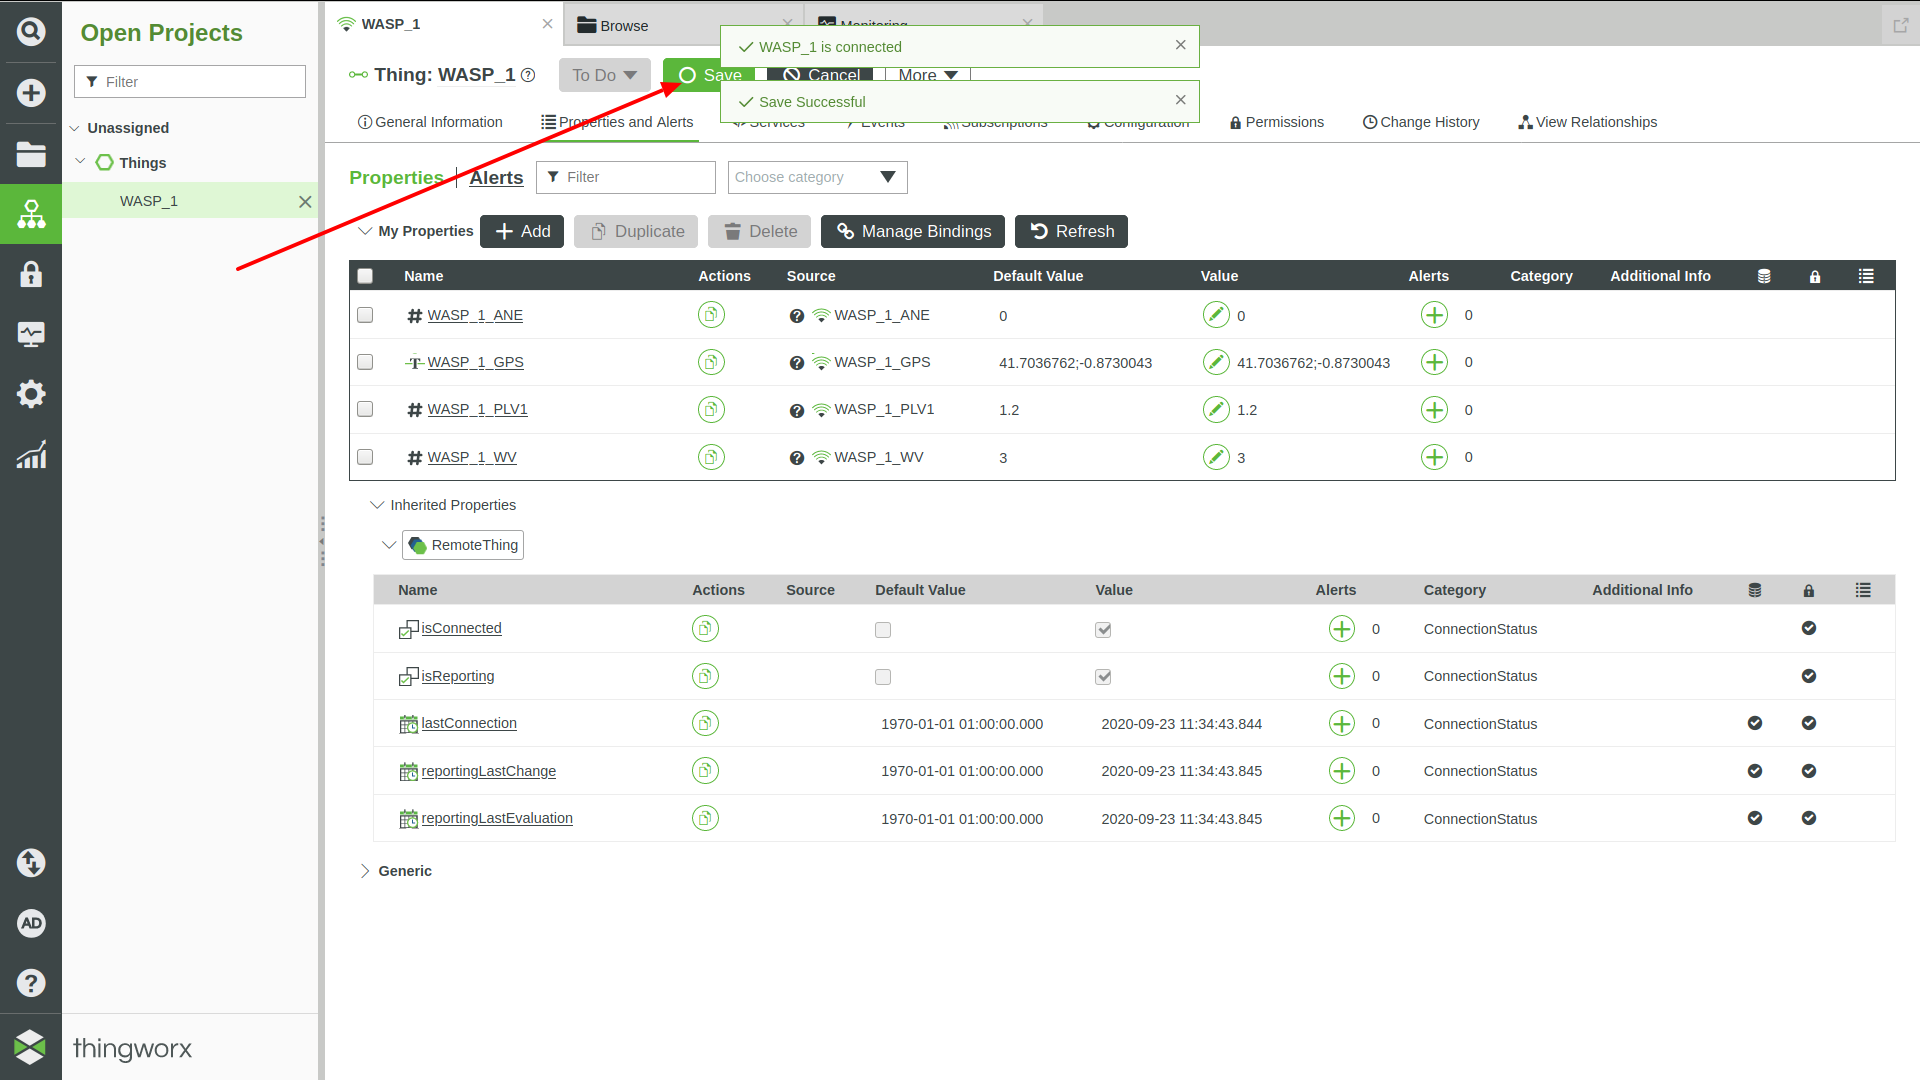
- Click on the button "Save" and repeat the Properties configuration for every remote thing shown in the Unbound tab.
Troubleshooting
| Problem | Solution(s) |
|---|---|
| Some sensor values are not updated | Repeat all steps described in the “Set up the Meshlium gateway” section and “Publish Sensor Values” section. |
| New Waspmote/Plug & Sense! node has been added to the Meshlium | Repeat all steps described in “Set up the Meshlium gateway” section. |
| New sensor has been added to a previously published Waspmote/Plug & Sense! Remote Thing | If you had configured your Waspmote/PS previously and your Waspmote/PS sensor list has changed, stop LUA and EMS processes and repeat all steps described in “Set up the Meshlium gateway” section in order to update your templates on the ThingWorx platform. Finally, repeat “Publish Sensor Values” section. |